
Container Gardens
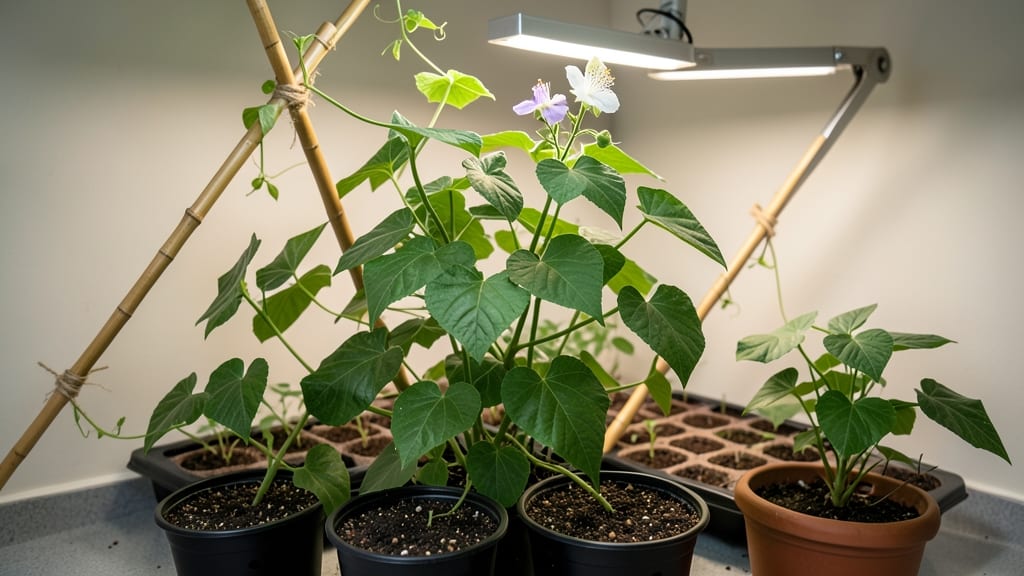
Growing green beans indoors turns tiny spaces into productive harvests. 🌱 I’ve grown bush beans and pole varieties in my sunroom, and the key is matching their needs to your light and airflow—no greenhouse required.
The right container and soil make all the difference, especially when roots can’t spread like they would outdoors.
You’ll need a 5-gallon pot or deeper container for bush beans, or a tall trellis setup for pole varieties that climb 6+ feet. Use well-draining potting mix with compost, and keep soil moist but not soggy—indoor air dries faster than you’d expect.
A south-facing window or grow light gives them the 6-8 hours of sunlight they crave, though they’ll tolerate less if you supplement with artificial light.
By week 6, you’ll be harvesting tender, crisp pods straight from your kitchen counter. The plants stay productive for months, and you avoid pests that plague outdoor gardens.
Plus, no bending over—just reach up and pick what you need. The vertical space they use is a game-changer for small apartments or sunrooms.
Once you master this, try growing other vertical crops like peas or cucumbers. The same principles apply, and you’ll soon have a mini indoor harvest year-round. Let’s get those beans growing!
📚 In This Guide
- What you need
- Instructions
- Tips and common mistakes
- Wrapping up and next steps
What you need
- ● Green Bean Seeds: 10–20 seeds (choose bush or pole varieties like 'Blue Lake' or 'Kentucky Wonder').
- ● Containers: 1–2 deep pots (12+ inches) or a vertical planter (e.g., fabric grow bags or hanging pockets) with drainage holes.
- ● Potting Mix: 2–3 gallons of well-draining, seed-starting mix (avoid garden soil—it’s too dense!).
- ● Grow Lights (or Sunny Window): Option 1: A full-spectrum LED grow light (12–16 hours/day, 6–12 inches above plants).
- ● Option 2: A south-facing window with 6+ hours of direct sunlight.
- ● Support Structures (for pole beans): Trellis, bamboo stakes, or a DIY wire frame (3–4 feet tall).
- ○ Optional: Twine or plant clips for securing vines.
- ● Watering Can or Spray Bottle: With a gentle nozzle to avoid disturbing seeds.
- ● Fertilizer: Balanced liquid fertilizer (5-5-5 or 10-10-10, diluted to half-strength).
- ● Seedling heat mat (for faster germination, especially in cooler homes).
- ● Humidity dome or plastic wrap (to retain moisture during germination).
- ● Self-watering planter (to maintain consistent moisture levels).
- ● Soil moisture meter (to track hydration without overwatering).
- ● Compost or worm castings (for nutrient-rich soil amendments).
- ● Pruning shears (for trimming leggy growth or harvesting).
Step-by-Step instructions for growing green beans indoors
Here's how to turn your indoor space into a productive green bean factory using vertical growing techniques.
🌱 Step 1: Choose the Right Variety and Containers
Select a bush bean variety like 'Blue Lake' or 'Contender'—they're compact and perfect for containers. Avoid pole beans unless you're using a trellis. I recommend 5-gallon fabric grow bags for each plant because they provide excellent drainage while mimicking outdoor soil conditions. These bags also prevent root circling, which is common in traditional pots.
Fill each bag with high-quality potting mix enriched with compost—this gives beans the nitrogen they crave. Press the soil down gently to eliminate air pockets, but don't compact it too tightly. The mix should feel like a damp sponge when squeezed. Add a slow-release fertilizer (5-10-10 ratio) mixed into the top 2 inches of soil to provide nutrients as the plants grow.
☀️ Step 2: Position for Maximum Light and Set Up Support
Green beans need 6-8 hours of direct sunlight daily, so place your containers near a south-facing window or under grow lights. If using lights, position them 6-12 inches above the plants and keep them on for 14-16 hours per day. You'll notice leaves turning pale or stems elongating if light is insufficient—this is a clear sign to adjust.
Install a vertical trellis or cage immediately after planting. I use 4-foot tall bamboo stakes tied together with twine to create a simple lattice. Secure the trellis to the container or a nearby wall to prevent tipping. Beans will start climbing within 2-3 weeks, so having support in place early prevents tangled vines and broken stems.
💧 Step 3: Plant and Water for Optimal Germination
Plant 3-4 seeds per container, spacing them 1 inch apart and ½ inch deep. Sowing too deep delays germination because the seedling must push through more soil. Water gently until the soil is evenly moist but not soggy—you should see moisture wicking up through the surface within minutes. Cover the container with a clear plastic dome or plastic wrap to retain humidity and warmth, which speeds germination.
Keep the soil at 70-80°F for fastest sprouting. You'll see tiny shoots emerge in 7-10 days. Once all seeds have sprouted, remove the dome immediately to prevent fungal diseases like damping-off. Thin the seedlings to 2-3 strongest plants per container by snipping the weakest at soil level with scissors—this reduces competition for nutrients and encourages bushier growth.
🌿 Step 4: Maintain Growth with Precision Care
Water when the top inch of soil feels dry, typically every 2-3 days depending on humidity. Beans are sensitive to moisture fluctuations, so I water deeply until it drains from the bottom of the container. Avoid wetting the leaves to prevent fungal issues. Fertilize every 4 weeks with a balanced liquid fertilizer (10-10-10) diluted to half strength—too much nitrogen leads to leafy growth at the expense of pods.
Train vines to climb by gently guiding them onto the trellis as they grow. You'll see new leaves and tendrils appear every 3-5 days. Harvest begins when pods reach 4-5 inches long—this encourages continuous production. Pick beans in the morning when they're crispest, and they'll stay fresh longer. If you miss the window, pods quickly toughen and lose flavor, so check daily.
✂️ Step 5: Prune and Extend the Harvest Season
Prune any yellow or diseased leaves immediately to redirect energy to pod production. Use sterilized pruning shears to make clean cuts just above a leaf node. I also pinch back the top 2 inches of the main stem when plants reach 3 feet tall—this promotes bushier growth and more harvest points. You'll notice new side shoots forming within 5-7 days after pruning.
To extend the harvest, provide 12 hours of darkness for 2 weeks to trigger flowering. Beans are sensitive to daylight changes, so use a blackout cloth or move them to a closet. After this period, return them to normal light conditions. With proper care, a single indoor plant can produce pounds of beans over a 6-8 week growing season, making it one of the most rewarding indoor crops.
Tips & tricks for perfect indoor green bean harvests
Transforming your indoor space into a thriving green bean garden takes a few strategic moves that make all the difference.
Light Optimization: If natural light falls short of the required 6-8 hours, supplement with full-spectrum grow lights positioned 6-12 inches above the plants. I've found that LED grow lights with a 14-16 hour daily cycle mimic summer sunlight perfectly. For best results, rotate containers weekly to ensure even growth—uneven light exposure causes lopsided plants. Watch for pale leaves or elongated stems as clear indicators your plants need more light.
Container Selection: The 5-gallon fabric grow bags mentioned in Step 1 are ideal, but if you're working with limited space, consider vertical wall pockets that hang on fences or trellises. These pockets provide excellent drainage while maximizing vertical growth. For urban apartments, stackable grow towers can accommodate multiple plants in minimal floor space. Just ensure whatever container you choose has drainage holes—waterlogged roots are the fastest way to kill your plants.
Germination Boost: To speed up the 7-10 day germination process, soak your bush bean seeds in warm water for 8 hours before planting. This pre-hydration jumpstarts growth and often results in sprouts appearing in just 5-7 days. After planting, maintain consistent soil moisture at 70-80°F by placing containers on a heat mat if your home tends to stay cool. The key is patience—don't disturb the soil while waiting for sprouts to emerge.
Harvest Timing: Those 4-5 inch pods mentioned in Step 4 are the sweet spot for flavor and texture. I harvest every morning between 8-10 AM when pods are at their crispest. Use clean scissors to snip pods at the stem—this prevents damaging the plant. A daily harvest check prevents pods from toughening, and you'll notice continuous production as the plant focuses energy on new pods rather than mature seeds.
Pro Tips for Growing Green Beans Indoors
- Transforming your indoor space into a thriving green bean garden takes a few strategic moves that make all the differ...
- Light Optimization: If natural light falls short of the required 6-8 hours, supplement with full-spectrum grow lights...
- Container Selection: The 5-gallon fabric grow bags mentioned in Step 1 are ideal, but if you're working with limited ...
Frequently asked questions
Got questions about growing green beans indoors?
You’re not alone! Here are some of the most common concerns—and their easy solutions—to help you crush your vertical harvest.
How long does it take for green beans to grow indoors?
Most bush bean varieties mature in 50–60 days from seed, while pole beans take slightly longer (60–70 days). With proper light (12+ hours/day) and warmth (70–80°F), you’ll see sprouts in 5–10 days and pods ready to pick in 8–12 weeks. Patience pays off—snip beans early to encourage more production!
Can I grow green beans indoors without sunlight?
Use a grow light (LED or fluorescent) 6–8 inches above plants for 12–16 hours daily. South-facing windows may work for a few hours, but supplement with artificial light to avoid leggy, weak plants. Pro tip: Rotate plants weekly for even growth!
Why are my indoor green beans turning yellow or wilting?
Yellow leaves often signal overwatering or nutrient deficiency. Let soil dry slightly between waterings (keep it moist, not soggy) and fertilize every 2–3 weeks with a balanced liquid fertilizer (10-10-10). Wilting? Check for root rot or pests—inspect leaves and adjust care accordingly.
What’s the best container size for growing green beans indoors?
For bush beans, aim for at least 12–18 inches deep and 12–15 inches wide per plant. Pole beans need taller containers (18+ inches) or a sturdy trellis. Use well-draining pots with drainage holes—green beans hate soggy roots! Group plants close together (they’re nitrogen-fixers and thrive in companionship).
Do green beans need cold nights to grow well indoors?
Not at all! Indoor green beans don’t require cold nights—they’re happy in consistent warmth (70–80°F). Avoid drafts (like AC vents) or sudden temperature swings, which can stress plants. A heat mat (for seeds) or grow light (for light) helps maintain ideal conditions year-round.
Can I regrow green beans from store-bought seeds?
Unfortunately, no—store-bought beans are often processed to prevent sprouting. Save seeds from your homegrown beans instead! Let pods fully mature on the vine, dry them, and store seeds in a cool, dark place. Fun fact: Heirloom varieties like ‘Blue Lake’ or ‘Contender’ are great for indoor regrowth!
Wrapping up and next steps
Growing green beans indoors is a rewarding way to enjoy fresh, homegrown produce—even in small spaces! With the right setup, patience, and care, you can transform your kitchen or balcony into a thriving vertical garden.
Whether you’re a beginner or a seasoned gardener, the key is consistency in light, water, and support.
Ready to take the next step? Start with just one container and experiment with varieties like Blue Lake or Mascotte. Before you know it, you’ll be harvesting crisp, flavorful beans straight from your indoor garden! 🌱