
Container Gardens
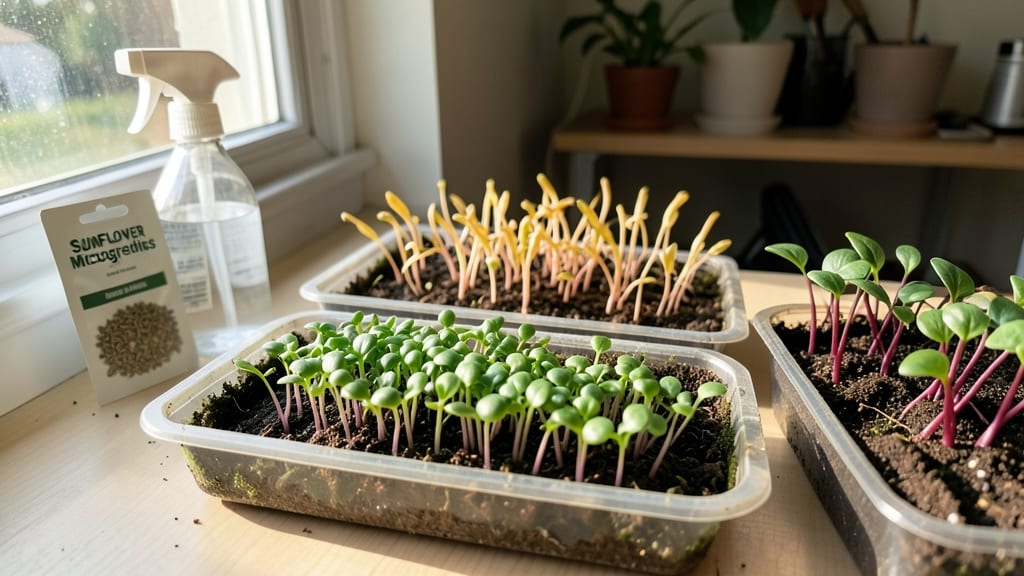
Planting microgreens indoors delivers fresh, nutrient-packed greens in just 7 days—no sunlight or yard required. 🌱 I’ve grown them on kitchen counters, windowsills, and even under desk lamps, and the results are shockingly lush for such a tiny effort. The key?
Fast germination, minimal space, and a few simple supplies that cost less than a salad at the store.
You’ll need a shallow container (anything from a repurposed takeout tray to a dedicated microgreen kit), a growing medium (potting soil or a seed mat), and seeds—broccoli, radish, or sunflower are my top picks for speed and flavor.
Most beginners overthink the setup, but the real magic happens in the first 48 hours when seeds sprout like clockwork. No fancy equipment needed—just patience and a spray bottle. By day 7, you’ll harvest 1-2 cups of greens per square foot, packed with more vitamins than store-bought sprouts.
The texture is crisp, the flavor bold, and the satisfaction of growing something this fast is unmatched. Plus, you’ll save money and reduce food waste by using scraps like lettuce or cabbage bases for planting. Works in any climate, any season, and even in small apartments.
Here’s how to avoid the most common pitfalls—like mold or leggy growth—so your first batch is flawless.
📚 In This Guide
- What you need
- Instructions
- Tips and common mistakes
- Wrapping up and next steps
What you need
- ● Seeds: Choose fast-growing varieties like broccoli, radish, sunflower, or pea shoots (1–2 tbsp per tray). Avoid organic seeds—they’re often untreated and may not sprout well.
- ● Growing Tray: A shallow, flat container (10" x 20" or similar) with drainage holes. Plastic, wooden, or recycled takeout containers work great!
- ● Growing Medium: Organic potting soil or a soilless mix (like coconut coir or peat moss). Avoid garden soil—it’s too dense.
- ● Water Spray Bottle: A 16–32 oz misting bottle for gentle hydration (no drowning seeds!).
- ○ Grow Lights (Optional but Recommended):strong> LED full-spectrum grow lights (12–16W per tray) or a fluorescent bulb (T5 or T8, 4000K–6500K color temp).
- ● Adjustable light stand or clip-on fixture to position lights 2–4 inches above trays.
- ● Scissors or Knife: For harvesting (a sharp pair prevents crushing stems).
- ○ Seedling Heat Mat (Optional): Speeds germination (70–80°F ideal). Look for a low-wattage mat (3–5W) under trays.
- ● Humidity Dome: A clear plastic lid or DIY cover (e.g., cut-from plastic bottle) to retain moisture during germination.
- ○ pH Test Kit: Ensures soil pH is 6.0–7.0 (optional but helpful for troubleshooting).
- ● Labels & Markers: Track seed types and planting dates (use waterproof labels!).
Step-by-step instructions for planting microgreens indoors
Here's how to grow vibrant microgreens in just a week—no sunlight required.
🌱 Step 1: Prepare Trays and Soak Seeds for Faster Germination
Start with four 10x20-inch shallow trays lined with damp paper towels or a single layer of organic growing mats. Place them on a flat surface where they won’t be disturbed. Choose your microgreen variety—radish, broccoli, or sunflower seeds all germinate quickly. Spread 2 tablespoons of seeds evenly across each tray, spacing them about 1 inch apart.
Here's the thing—soaking seeds first cuts germination time in half. Place the seeds in a bowl of lukewarm water for 6-8 hours before planting. You’ll see them plump up noticeably. Drain them well afterward to prevent mold, then spread them evenly on the damp towels. Cover the trays with another layer of moist towels and place them in a dark, warm spot—like your pantry or a closed cabinet.
💧 Step 2: Maintain Moisture and Check for Sprouting
Keep the towels consistently moist but never soggy. Mist lightly with room-temperature water every 8-12 hours to maintain humidity. You’ll know it’s right when the towels feel damp to the touch but don’t pool with water. Microgreens need darkness to germinate, so avoid peeking too often—just trust the process.
After 24-48 hours, you’ll see tiny white roots emerge. This is your signal to stop soaking and focus on moisture. If you notice any black spots or fuzzy mold, remove those seeds immediately and increase airflow. Real talk: mold is the #1 killer of indoor microgreens, so don’t skip this step.
☀️ Step 3: Introduce Light and Monitor Growth
On day 3-4, when sprouts reach about ½ inch tall and you see the first true leaves unfurling, it’s time to move them to light. Place the trays under a grow light (LED or fluorescent) positioned 6-12 inches above the plants. They’ll need 12-16 hours of light daily—a simple timer on your light fixture makes this effortless.
Watch for leggy growth, which happens when the light is too far away. You’ll see it as thin, pale stems stretching toward the light. If this happens, lower the light source immediately. Microgreens are ready to harvest when they reach 1-3 inches tall, typically within 7-10 days total. Broccoli and radish varieties are crispest at the smaller end of that range.
✂️ Step 4: Harvest and Store for Maximum Freshness
Use clean, sharp scissors to snip the microgreens just above the soil line. Work quickly to avoid crushing the delicate stems. Rinse them gently under cool water to remove any soil residue, then spin dry in a salad spinner or pat dry with a paper towel. The goal is to keep them as dry as possible to extend shelf life.
Store harvested microgreens in an airtight container lined with a paper towel to absorb excess moisture. They’ll stay fresh in the fridge for 5-7 days. For longer storage, blanch and freeze them in ice cube trays—just add a splash of water to each cube before freezing. This preserves their vibrant color and nutrient density for up to 3 months.
Tips & tricks for perfect indoor microgreen growth
Here's what nobody tells you about growing microgreens indoors—these tricks save time and prevent common pitfalls.
Seed Selection: Radish seeds germinate fastest (24-48 hours), while sunflower seeds take slightly longer (48-72 hours). For consistent results, use seeds from the same batch—mixed seed varieties can create uneven growth patterns. I always buy organic seeds because conventional seeds sometimes contain chemical treatments that inhibit germination.
Darkness is Critical: In Step 1, when placing trays in a dark spot, choose a location where the temperature stays between 65-75°F. Too cold (below 60°F) slows germination, while too warm (above 80°F) can cause mold. I use my pantry with a small space heater during winter months to maintain ideal conditions. The darkness triggers the seeds to focus energy on root development rather than leaf growth.
Light Transition: When moving trays to light on day 3-4, start with 12 hours of light and gradually increase to 16 hours over 24 hours. Sudden full-spectrum light exposure can shock delicate sprouts. I use a simple LED grow light on a timer—it's affordable and provides the right spectrum for microgreens without the high electricity cost of specialty lights.
Harvest Timing: Broccoli microgreens are best harvested at 1-2 inches tall for maximum flavor and tenderness, while sunflower varieties can go up to 3 inches. Use clean scissors and cut just above the soil line—this encourages a second harvest if you leave about ½ inch of stem. I harvest in the morning when moisture levels are lowest, which helps prevent wilting during storage.
Pro Tips for Planting Microgreens Indoors
- Here's what nobody tells you about growing microgreens indoors—these tricks save time and prevent common pitfalls.
- Seed Selection: Radish seeds germinate fastest (24-48 hours), while sunflower seeds take slightly longer (48-72 hours).
- Darkness is Critical: In Step 1, when placing trays in a dark spot, choose a location where the temperature stays between 65-75°F.
Frequently asked questions
Got questions about growing microgreens indoors?
You’re not alone! Here are answers to the most common concerns—from timing to troubleshooting—to help you succeed without sunlight.
How long does it take to grow microgreens indoors?
Most microgreens are ready to harvest in just 7–14 days! Fast growers like radish or broccoli sprout in a week, while slower varieties (e.g., sunflower) may take 2 weeks. The key? Consistent moisture, warmth (65–75°F), and 12–16 hours of grow light daily.
Do I need sunlight, or will grow lights work?
Grow lights are perfect for indoor microgreens! Sunlight isn’t required—LED or fluorescent bulbs (6000K–6500K) mimic natural light. Place lights 2–4 inches above your tray and keep them on for 12+ hours/day. Just avoid heat stress (keep lights cool to the touch).
Why are my microgreens turning yellow or moldy?
Yellowing? Likely overwatering or poor drainage. Mold (fuzzy spots)? Too much moisture or weak airflow. Fix it by:
- Using a well-draining tray (e.g., with holes).
- Watering only when the topsoil feels dry (not soggy).
- Spraying neem oil (1 tsp/gallon water) if mold appears.
- Ensuring gentle airflow (a small fan on low helps).
Can I grow microgreens in small spaces, like a windowsill?
Use a shallow tray (2–3 inches deep) and place it on a sunny windowsill (south-facing is best). If natural light is weak, supplement with a clip-on grow light. Just rotate your tray daily for even growth. Compact varieties like peashoots or amaranth thrive in tight spots!
Which microgreens are easiest for beginners?
Start with these fast, forgiving picks:
- Radish – Ready in 5–7 days, peppery flavor.
- Broccoli – Mild taste, sturdy stems.
- Arugula – Grows in 10–14 days, spicy kick.
- Lentils – Super fast (4–5 days), earthy taste.
How often should I harvest microgreens?
Harvest when the first true leaves (not seed leaves) appear, usually 1–2 inches tall. Snip with clean scissors just above the soil to encourage regrowth. For a continuous harvest, replant every 3–5 days—no wasted space!
Wrapping up and next steps
Growing microgreens indoors is a rewarding way to enjoy fresh, nutrient-packed greens year-round—no sunlight required! 🌱 With just a few simple supplies and a week of patience, you’ll have vibrant sprouts ready to elevate your meals.
Start small, experiment with flavors, and soon you’ll be harvesting homegrown goodness like a pro.
Ready to take the next step? Try planting a new batch this weekend! Share your progress or favorite microgreen varieties in the comments—we’d love to see (and taste) your success. Happy growing! 🌿