Planting
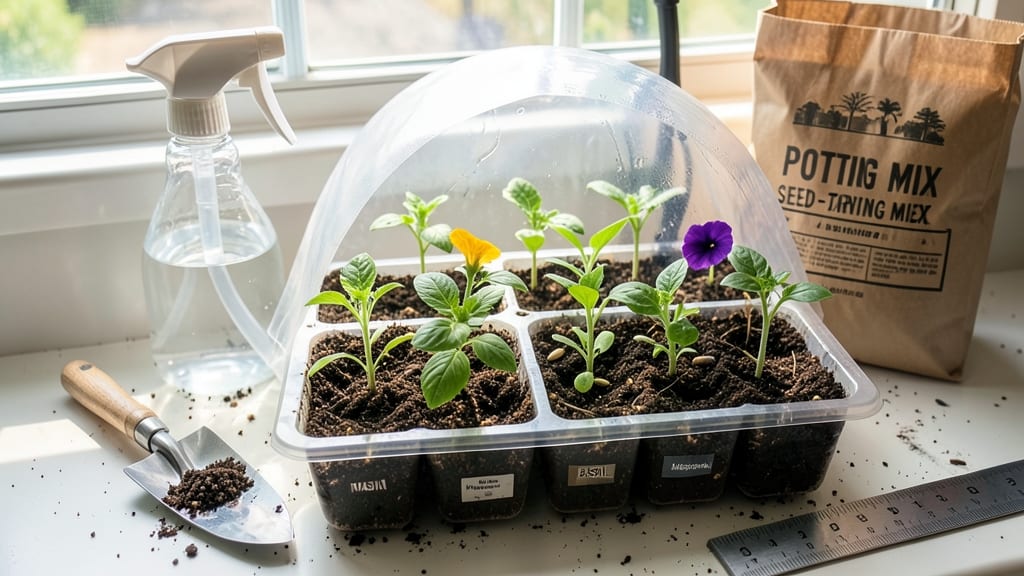
Sowing flower seeds indoors gives you a head start on next summer's garden—three months of growth before the first frost. 🌱 I've turned my kitchen counter into a nursery for petunias, snapdragons, and marigolds, and the secret isn't complicated: timing, warmth, and patience.
Most beginners overthink the setup, but you only need a few supplies and a sunny spot to get started.
The key is starting seeds at the right time—6-8 weeks before your last frost date—to give them a strong root system before transplanting. A simple tray with seed-starting mix, a spray bottle, and a heat mat (or warm windowsill) creates the perfect environment.
I've watched tiny seedlings transform into sturdy transplants ready for the garden in just a few weeks.
By the time you're ready to move them outside, you'll have bushier plants with more blooms than store-bought seedlings. The process builds confidence, too—there's nothing like seeing those first green shoots push through the soil after days of waiting. Plus, you'll save money and get exactly the varieties you love.
Whether you're growing annuals for summer color or perennials that'll come back year after year, this method works. The only real mistake is starting too early or too late—so check your frost dates and get those seeds going at the perfect time!
📚 In This Guide
- What you need
- Instructions
- Tips and common mistakes
- Wrapping up and next steps
What you need
- ● Seed starting trays – 1-2 (1020-cell trays or 72-cell trays work great for tiny seeds)
- ● Seed starting mix – 1 bag (look for a lightweight, sterile mix labeled for seedlings)
- ● Flower seeds – Choose your favorites! (Check seed packets for indoor sowing recommendations)
- ● Spray bottle – 1 (with a fine mist nozzle for gentle watering)
- ● Clear plastic domes or plastic wrap – 1 (to create a humid environment)
- ● Grow lights or LED bulbs – 1-2 (full-spectrum bulbs, 12-16 hours/day)
- ○ Heat mat (optional but helpful) – 1 (for seeds needing warmth, like petunias or snapdragons)
- ● Small hand trowel or spoon – 1 (for planting seeds without crushing them)
- ● Labels & markers – 1 pack (to track seed varieties)
- ○ Fertilizer (optional) – 1 (balanced, water-soluble, half-strength for seedlings)
- ● Scissors or knife – 1 (for cutting plastic wrap or drainage holes)
- ○ Thermometer (optional) – 1 (to monitor soil temp if using a heat mat)
Step-by-step instructions for sowing flower seeds indoors
Here's how to get those delicate petals off to the right start—no fancy tools needed.
🌱 Step 1: Gather Supplies and Prep Containers
You'll need small seed trays or pots (at least 2-3 inches deep), sterile seed-starting mix, and the flower seeds you've chosen. I like to use biodegradable pots because they eliminate transplant shock when it's time to move seedlings outside. Clean your containers with a 10% bleach solution (1 part bleach to 9 parts water) to kill any lingering pathogens, then rinse thoroughly.
Fill each container about ¾ full with the seed-starting mix. Tap gently on the table to settle the soil, but don't pack it down—you want it light and airy for those tiny roots. The mix should feel like a damp sponge when squeezed; if it crumbles, add a little water. I always moisten the soil before sowing because dry pockets can cause uneven germination.
🌱 Step 2: Sow Seeds at the Right Depth
Check the seed packet for specific depth recommendations, but a general rule is to plant seeds at a depth of twice their diameter. Tiny seeds like petunias or snapdragons go just ¼ inch deep, while larger seeds like marigolds can go ½ inch down. Use your finger or a small spoon to make a tiny hole, place 1-2 seeds inside, then cover lightly with more soil—don't press down or you'll smother them.
I tap the seed packet gently to release one seed at a time—planting too many in one hole leads to weak, crowded seedlings. After sowing, mist the surface with water until it's evenly damp but not soggy. A spray bottle works best because it delivers gentle moisture without disturbing the seeds. Label each container with the flower type and date; you'll forget which is which once those green shoots appear!
💧 Step 3: Provide Warmth and Humidity for Germination
Cover the trays with a clear plastic dome or wrap them in plastic wrap to create a mini greenhouse. This traps warmth and humidity, which most flower seeds need to sprout. Place the containers in a warm spot—70-75°F is ideal—like on top of the fridge or near a sunny window. You'll see the first sprouts in 5-14 days, depending on the flower type; delicate blooms like pansies germinate faster than heartier varieties like zinnias.
Check daily but resist the urge to water until you see condensation on the plastic. The dome keeps moisture levels perfect, and overwatering now can drown those fragile seedlings. Once 50% of seeds have sprouted, remove the dome immediately—trapped humidity invites damping-off, a fungal disease that collapses stems overnight. Keep the soil moist but not wet; you'll know it's right when the surface looks slightly damp but not glistening.
☀️ Step 4: Move to Bright Light and Care for Seedlings
The instant those first true leaves appear (the second set after the initial cotyledons), move the seedlings to a bright, sunny spot with at least 12-14 hours of light daily. A south-facing window rarely provides enough intensity, so I use a grow light positioned 2-3 inches above the plants. Without sufficient light, seedlings stretch toward the window (called "leggy") and never recover proper strength.
Water gently from the bottom by placing the trays in a shallow dish of water for 10-15 minutes. This encourages roots to grow downward and prevents fungal diseases from splashing water on the leaves. You'll know it's time to water again when the top inch of soil feels dry to the touch. Fertilize lightly with a diluted liquid fertilizer (half-strength) after the first true leaves appear to give them a gentle boost.
⏰ Step 5: Harden Off Before Transplanting
Two weeks before your last frost date, start hardening off the seedlings by placing them outside in a sheltered, shaded spot for 1-2 hours the first day. Gradually increase outdoor time by 1 hour daily over 10-14 days, slowly introducing more sun and wind. This toughens up the seedlings so they're ready for the garden without going into shock.
Skipping this step burns leaves, breaks stems, and stresses plants severely. Once seedlings tolerate a full day outside without wilting, they're ready for the garden. Transplant on an overcast afternoon to reduce transplant shock and water deeply at the base. Watch those blooms burst into color in no time!
Tips & tricks for perfect indoor flower seed starting
These little tricks will help you avoid common pitfalls and grow stronger seedlings every time.
Container Selection Matters: While biodegradable pots are great, you can also use yogurt cups with drainage holes punched in the bottom. Just make sure they're at least 2-3 inches deep—shallow containers stunt root growth. I've even repurposed clean plastic takeout containers by cutting holes in the bottom and lining them with coffee filters for drainage.
Soil Prep Secret: Before sowing, I run a thin layer of sand or perlite over the bottom of each container. This creates a tiny drainage layer that prevents water from pooling at the roots, which is especially important during the 10-15 minute bottom-watering phase. The extra air space also helps prevent damping-off disease that can wipe out seedlings overnight.
Lighting Upgrade: If you don't have a grow light, try placing your seedlings under a bright LED bulb (6000K color temperature) about 6 inches away for 12-14 hours daily. Regular incandescent bulbs won't cut it—they produce too much heat. I keep mine on a timer so I don't forget to turn them off, which can scorch tender leaves.
Germination Troubleshooting: If you're not seeing sprouts within the 5-14 day window, check your seed viability first. Place a few seeds on a damp paper towel in a sealed baggie—if they don't sprout in 3-5 days, they might be old. Also verify your 70-75°F warm spot—most household thermostats run cooler than this, especially at night. A heating pad on low under the trays can make all the difference for cold-weather starters.
Pro Tips for Sowing Flower Seeds Indoors
- These little tricks will help you avoid common pitfalls and grow stronger seedlings every time.
- Container Selection Matters: While biodegradable pots are great, you can also use yogurt cups with drainage holes punched in the bottom.
- Soil Prep Secret: Before sowing, I run a thin layer of sand or perlite over the bottom of each container.
Frequently asked questions
Got questions about starting your flower seeds indoors? You’re not alone! Here are some of the most common concerns—and their easy solutions—to help you grow confidently.
When is the best time to start sowing flower seeds indoors?
Timing depends on your climate and flower type! As a rule, sow 6–8 weeks before the last frost date for annuals (like marigolds or petunias) and 8–12 weeks before for perennials (like lavender or coneflowers). Check seed packets for specific guidance—they’re your best friend!
What if my indoor space is too cold for germination?
No worries! Most seeds need warmth (around 65–75°F) to sprout. Use a seedling heat mat or place trays on top of your fridge for gentle warmth. Avoid direct sunlight until sprouts appear—bright, indirect light is key until they’re ready for their first stretch!
How do I know if my seeds need more water?
Overwatering is a sneaky killer! Keep soil consistently moist but not soggy. Stick your finger 1 inch deep—if it’s dry, water gently until it drains from the bottom. Yellowing leaves or mold? You’re overdoing it. A spray bottle works great for delicate seedlings!
Can I reuse containers or soil from last year?
Reusing containers is fine if they’re clean (scrub with soap and water), but fresh, sterile potting mix is a must. Old soil can harbor diseases or pests. Pro tip: Mix in a bit of perlite or vermiculite to improve drainage—your seedlings will thank you!
My seedlings look leggy or weak—what went wrong?
Leggy seedlings usually mean they’re stretching for light. Move trays closer to a bright window (south-facing is ideal) or add a grow light 2–3 inches above them for 12–16 hours daily. Rotate trays daily so they grow straight, not lopsided!
Wrapping up and next steps
Sowing flower seeds indoors is a rewarding way to kickstart your gardening season and enjoy vibrant blooms ahead of schedule! 🌱 With the right materials, timing, and care, you can transform tiny seeds into thriving plants—ready to brighten up your garden or home.
Whether you’re a seasoned gardener or a beginner, this early start sets the stage for a colorful and successful growing season.
Now that you’re armed with the know-how, take the next step: gather your supplies, pick your favorite seeds, and start sowing! Watch your green thumb grow as you nurture these little sprouts into something extraordinary. Happy planting! 🌸