
Planting
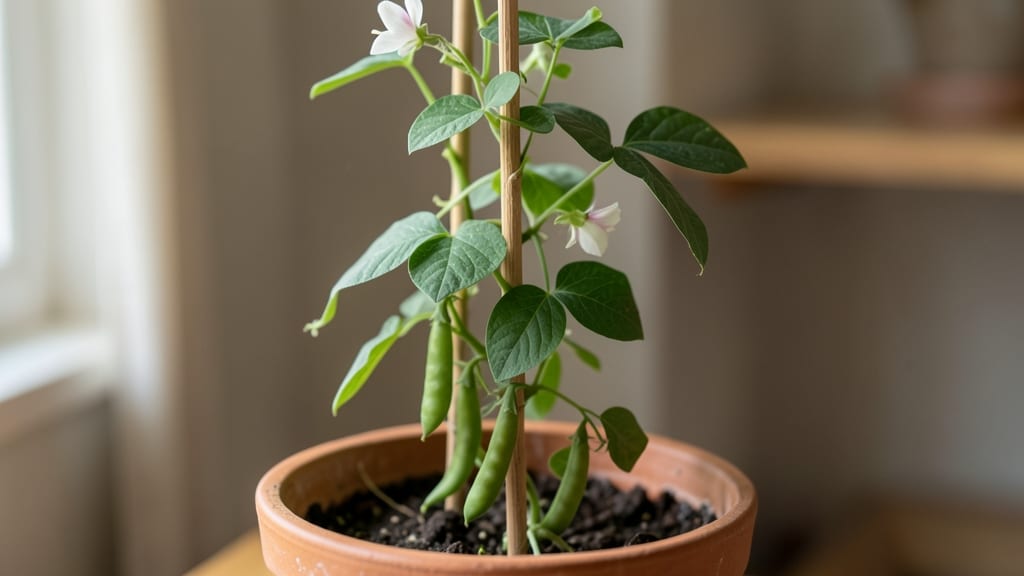
Growing pea plants indoors starts with the right warmth and moisture tricks—fast germination is possible with just a few simple adjustments. 🌱 I’ve watched tiny seeds transform into lush green vines in under a week using this method, and it works even in apartments with limited sunlight.
The key is choosing dwarf or bush varieties like ‘Sugar Ann’ or ‘Tom Thumb,’ which thrive in containers. You’ll need a 5-10 gallon pot with drainage, a mix of potting soil and compost, and a spot near a sunny window or under a grow light.
Peas love cool temps (60-70°F) but need consistent moisture—never let the soil dry out completely.
By week 3, you’ll see vibrant green tendrils climbing or sprawling, and with proper support (like a small trellis), they’ll produce sweet, tender peas in just 60-70 days. The secret? A warm, humid environment during germination and regular watering to keep roots happy.
Works for small spaces, balconies, or even kitchen windowsills—just avoid overwatering and watch for pests like aphids. Here’s how to keep them thriving indoors all season long.
📚 In This Guide
- What you need
- Instructions
- Tips and common mistakes
- Wrapping up and next steps
What you need
- ● Pea Seeds: 10–20 sugar snap, snow, or shelling peas (choose early-maturing varieties like ‘Sugar Sprint’ or ‘Oregon Sugar Pod’ for indoor growing).
- ● Containers: 2–4 6–8 inch deep pots (with drainage holes) or
- ● A 10–12 inch long shallow trough or fabric grow bag (for trellising).
- ● Potting Mix: 2–3 gallons of lightweight, well-draining seed-starting mix (avoid garden soil—it’s too dense!).
- ● Trellis or Support: 1–2 small bamboo stakes, wire mesh, or a mini A-frame trellis (peas need vertical space!).
- ○ Optional: Twine or soft plant ties to secure vines.
- ● Watering Can or Spray Bottle: With a gentle spray nozzle (peas hate soggy roots!).
- ○ Heat Mat (Optional but Helpful): A small seedling heat mat (70–75°F range) to speed up germination.
- ● Grow Lights: A full-spectrum LED bulb (12–16 hours/day) if natural light is limited.
- ● Fertilizer: A balanced liquid fertilizer (5-5-5 or 10-10-10) diluted to half-strength, applied every 2–3 weeks.
- ● Humidity Dome: A clear plastic cover to retain moisture during germination.
- ● Peat Pellets or Jiffy Pots: For easier transplanting later.
- ● Thermometer/Hygrometer: To monitor temperature (65–75°F) and humidity (50–70%).
Step-by-step instructions for growing peas indoors
Here’s how to coax fast germination and lush growth from pea plants using warmth and moisture—no greenhouse required.
🌱 Step 1: Soak Seeds Overnight for Faster Germination
Pea seeds have tough outer shells that slow germination, so I soak them overnight in a bowl of lukewarm water to soften the coating. Place the bowl in a warm spot—70-75°F speeds up the process. After 12 hours, drain and gently pat the seeds dry with a paper towel. This trick cuts germination time by nearly half.
Don’t skip this step—dry seeds can take 2-3 weeks to sprout, while soaked seeds often emerge in 5-7 days. You’ll know they’re ready when the outer skin wrinkles slightly and the seed feels slightly softer to the touch.
🪴 Step 2: Plant in Moist, Well-Draining Soil
Fill a 6-inch deep container with a mix of 50% potting soil and 50% perlite or vermiculite to ensure drainage—peas rot quickly in soggy soil. Moisten the mix until it’s damp but not dripping, then press it gently into the container to remove air pockets. Peas need support, so place a 3-inch tall trellis or mesh screen vertically in the pot before planting.
Plant the soaked seeds 1 inch deep, spacing them 2 inches apart in rows. I tap the soil lightly around each seed to secure it without compacting. Cover the container with plastic wrap to trap warmth and moisture—this mimics outdoor soil conditions and encourages faster sprouting.
💧 Step 3: Maintain Warmth and Consistent Moisture
Peas thrive in 60-70°F soil temperatures, so place the container on a seedling heat mat or near a sunny window. Remove the plastic wrap once sprouts appear (5-7 days), but keep the soil surface consistently moist—never soggy. Water from the bottom by placing the container in ½ inch of water for 10 minutes to avoid disturbing the seeds.
You’ll see the first true leaves (not the initial seed leaves) emerge in 10-14 days. At this stage, move the pot to a spot with 6+ hours of indirect light daily. Leggy seedlings mean your light is too weak—rotate the pot weekly so all sides grow evenly.
✂️ Step 4: Train Vines and Harvest Regularly
Once vines reach 4-6 inches tall, gently guide them up the trellis or mesh. Peas need support to climb, and this prevents tangled roots. Pinch off any side shoots that form below the first few leaves to encourage upward growth—this directs energy to the main stem and pods.
Harvest begins when pods are 2-3 inches long and plump but still bright green. Snap them off at the stem with a quick twist—this encourages more flowers and pods. Regular harvesting keeps plants productive for 4-6 weeks indoors, depending on the variety.
⏰ Step 5: Extend the Season with Care
Peas are cool-season plants, so if temperatures rise above 80°F, move the container to a cooler spot or use a small fan to circulate air. Reduce watering slightly in hot conditions—let the top inch of soil dry between waterings to prevent fungal issues.
With proper care, your indoor peas will produce 2-3 harvests before slowing down. Save seeds from the best pods to replant next season—just let them dry completely on the vine before storing in a cool, dark place.
Tips & tricks for indoor pea plant success
Here's how to sidestep common pitfalls and maximize your indoor pea harvest.
Soaking Secret: The 12-hour soak in lukewarm water isn't just about speed—it's about breaking dormancy. I add a pinch of seaweed fertilizer to the water during soaking for an extra nutrient boost that gives seedlings a stronger start. After draining, I place the seeds between damp paper towels in a sealed container for 24 hours to maintain humidity before planting. This creates a more controlled environment than just air-drying on a towel.
Light Strategy: Those 6+ hours of indirect light are critical, but quality matters more than quantity. I use a simple LED grow light on a timer for 12 hours daily—it's more efficient than sunlight and prevents leggy growth. Position it 6 inches above the plants and adjust as they grow. If using natural light, rotate the pot weekly so all sides receive even exposure. Yellowing leaves mean your plants need more light, while dark green leaves indicate they're getting just right.
Heat Hack: Maintaining that 60-70°F soil temperature range is easier than it sounds. I place my seedling heat mat under a ceramic pot (not plastic) because ceramics conduct heat better. For those without a heat mat, I use a small space heater with a thermostat set to 72°F, keeping it 18 inches away from the plants. The key is consistency—fluctuations above 80°F stress the plants and can halt growth completely.
Harvest Timing: The 2-3 inch pod size window is small, but it's the sweet spot for both flavor and texture. I harvest every other day during peak production to encourage continuous flowering. When pods start turning yellow or the peas inside feel hard, they've passed their prime. A quick trick: if you can see the peas through the pod but they're still small, wait a day—they'll plump up beautifully overnight.
Pro Tips for Pea Plant Indoors
- Here's how to sidestep common pitfalls and maximize your indoor pea harvest.
- Soaking Secret: The 12-hour soak in lukewarm water isn't just about speed—it's about breaking dormancy. I add a pinch...
- Light Strategy: Those 6+ hours of indirect light are critical, but quality matters more than quantity. I use a simple...
Frequently asked questions
Got questions about growing pea plants indoors? You’re not alone! Here are answers to the most common queries to help you succeed with your indoor pea garden.
How long does it take for pea seeds to germinate indoors?
Pea seeds typically germinate in 7–14 days indoors, depending on warmth and moisture. Use a seedling heat mat (70–80°F) to speed it up! Keep soil damp but not soggy—consistency is key. If seeds take longer than two weeks, check moisture levels or try fresh seeds.
Can I grow pea plants indoors without sunlight?
Pea plants need light to thrive, but you can supplement natural sunlight with grow lights (12–16 hours/day). Place them 6–12 inches above plants. South-facing windows work, but weak light may lead to leggy, weak stems. Rotate plants weekly for even growth!
Why are my pea plant leaves turning yellow?
Yellow leaves often signal overwatering or nutrient deficiency. Let soil dry slightly between waterings, and fertilize lightly with a balanced 10-10-10 mix every 4–6 weeks. Check for pests (like aphids) too—wipe leaves with soapy water if needed. Drainage issues? Repot in well-aerated soil!
Are there dwarf pea varieties better for indoor growing?
Yes! Opt for compact varieties like ‘Sugar Sprint’ or ‘Tom Thumb’—they stay under 2 feet tall and thrive in containers. Avoid vining types (like ‘English peas’) unless you have trellises. Dwarf peas also mature faster (50–60 days), perfect for small spaces!
How do I harvest peas indoors for the best flavor?
Harvest when pods are firm but plump, usually 60–70 days after planting. Pick in the morning for peak sweetness. Use scissors to snip stems—never pull pods to avoid damaging plants. Eat fresh or store in the fridge for 3–5 days. Pro tip: Regular harvesting encourages more production!
Wrapping up and next steps
Growing pea plants indoors is a rewarding way to enjoy fresh, homegrown produce—even in small spaces!
With the right warmth, moisture, and a little patience, you’ll unlock fast germination and thriving vines in no time. 🌱 Whether you’re a beginner or a seasoned gardener, these tricks make it easier than ever to cultivate your own edible greens.
Ready to take the next step? Start by gathering your supplies, then plant those peas and watch your indoor garden flourish. Happy growing! 🌿