
Orchid Care
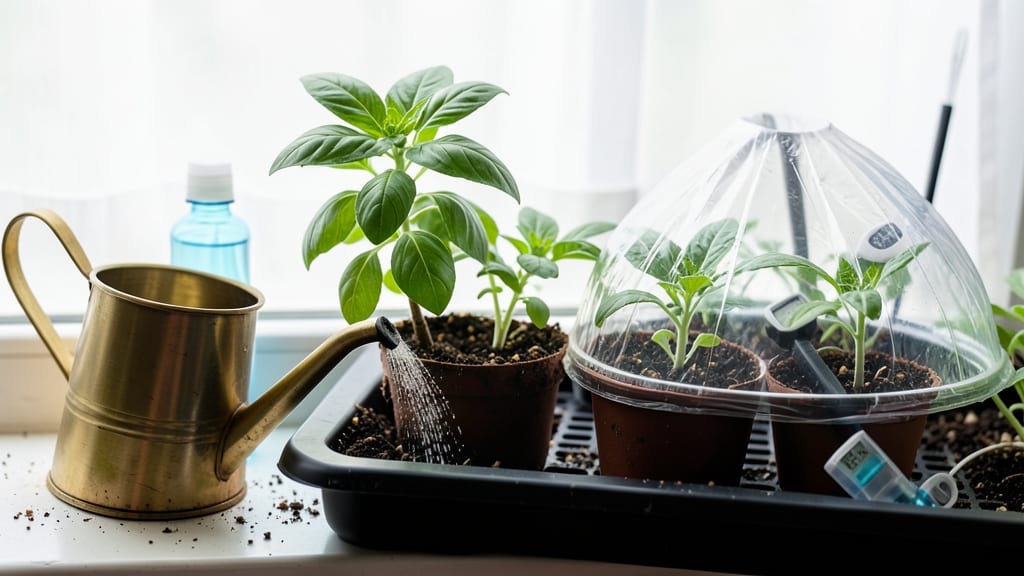
Mastering how to water seedlings indoors transforms weak, leggy sprouts into sturdy, thriving plants. 🌱 The mist-and-drain method prevents overwatering while keeping roots happy—my secret weapon after losing seedlings to mold and rot last spring. Most beginners drown their starts, but this approach mimics natural rainfall cycles perfectly.
You’ll need a shallow tray, a spray bottle, and well-draining seed-starting mix. The key is bottom-watering: place trays in water for 10-15 minutes, then drain excess.
This encourages deep root growth instead of surface moisture that breeds fungus. Check soil moisture daily—it should feel like a damp sponge, not soggy or bone-dry.
Healthy seedlings have plump leaves and crisp stems, not wilting or yellowing foliage. Overwatering causes moldy soil and stunted growth, while underwatering leads to dry, brittle roots. Adjust frequency based on your home’s humidity—dry air means more frequent misting, while humid spaces need less.
This method works for any indoor setup, from sunny windowsills to grow lights. Once seedlings hit 2-3 inches tall, transition to top-watering gradually. The payoff? Stronger plants ready for transplanting without shock. Let’s get those roots growing right!
📚 In This Guide
- What you need
- Instructions
- Tips and common mistakes
- Wrapping up and next steps
What you need
- ● Seedlings: 1-10+ (depending on your setup; orchids or other epiphytes work best).
- ● Seedling trays or pots: Plastic or fabric grow trays (with drainage holes) – 1 tray per 10-20 seedlings.
- ● OR Small pots (2-4 inches in diameter) with drainage holes – 1 pot per seedling.
- ● Growing medium: Orchid bark mix (1/4" to 1/2" chunks) – enough to fill trays/pots halfway.
- ● OR Sphagnum moss (for humidity-loving seedlings) – 1-2 inches thick.
- ● Watering tools: Fine-mist spray bottle (16 oz) – for gentle misting.
- ○ Watering can with a rose attachment (optional, for larger setups).
- ● Drainage tray or saucer: 1 per tray/pot setup – to catch excess water.
- ○ Humidity dome or plastic wrap: 1 (optional but helpful for high humidity).
- ● pH-balanced fertilizer: Diluted liquid fertilizer (20-20-20 or orchid-specific) – 1 tsp per gallon of water (use sparingly!).
- ● Grow lights: LED or fluorescent (12-16 hours/day) – for seedlings needing extra light.
- ● Hygrometer: To monitor humidity levels (ideal: 50-70%).
- ● Tweezers: For delicate seedling handling.
- ● Label markers: To track seedling types and watering schedules.
- ● Peat pellets or coco coir: For moisture retention (if bark mix isn’t available).
Step-by-Step instructions for watering seedlings indoors
Mastering this method prevents leggy stems and rot—here’s how to do it right.
💧 Step 1: Mist Seedlings Lightly Until Soil is Evenly Damp
Fill a clean spray bottle with room-temperature water and mist the soil surface until it feels uniformly damp but not soggy. You want moisture to penetrate about ½ inch deep—enough to encourage root growth without suffocating tender stems. Avoid pouring water directly from above; seedlings hate wet leaves, which can lead to fungal issues.
I like to test moisture by pressing a finger ½ inch into the soil. If it feels dry, mist again. If it’s still damp, wait another day. Overwatering at this stage is the fastest way to kill seedlings before they even sprout. Real talk: I’ve lost entire trays this way, so don’t rush it.
🌱 Step 2: Let Excess Water Drain Completely Through the Bottom
Place your seedling tray on a saucer or in a sink to catch excess water. Let gravity do the work—wait until you see water pooling in the saucer, then tip it out. This ensures roots don’t sit in standing water, which causes rot. If your containers lack drainage holes, skip this step and just let the soil absorb moisture naturally.
Here’s the thing—some growers swear by bottom-watering (placing trays in shallow water), but I’ve found it’s riskier for seedlings. The mist-and-drain method gives you better control over moisture levels. After draining, return the tray to its growing spot, but avoid placing it back on a damp surface.
☀️ Step 3: Monitor Soil Moisture Between Waterings
Check soil moisture daily by lifting the tray—damp soil should feel cool to the touch. If the top ¼ inch feels dry, it’s time to mist again. Seedlings need consistent moisture, but not constant wetness. I’ve seen growers water on a strict schedule, only to end up with moldy soil or stunted growth.
Watch for visual cues: healthy seedlings have firm stems and vibrant leaves. If leaves start curling or yellowing, you’re either overwatering or underwatering. Most beginners err on the side of too much water, so when in doubt, wait a day before misting again.
⏰ Step 4: Adjust Frequency Based on Seedling Stage
Newly sprouted seedlings need misting every 1-2 days until their first true leaves appear. Once they’ve developed 2-3 sets of true leaves, space waterings to every 2-3 days. The goal is to encourage deep root growth, not shallow, weak roots that rely on constant surface moisture.
This is the moment that matters: when seedlings hit the 2-leaf stage, reduce misting frequency. I’ve seen growers keep up heavy watering, and their seedlings grow top-heavy with weak stems. Strong roots mean sturdy plants ready for transplanting—don’t skip this adjustment.
✂️ Step 5: Transition to Bottom Watering for Larger Seedlings
Once seedlings have 4-5 true leaves and are about 2-3 inches tall, switch to bottom watering. Place the tray in a shallow dish of water for 10-15 minutes, then drain completely. This method encourages roots to grow downward and strengthens the stem.
Don’t rush this transition—wait until seedlings are established enough to handle the change. I’ve seen beginners switch too early, and their seedlings wilt dramatically. The key is patience: let them adjust gradually, and you’ll have robust plants ready for the garden.
Tips & tricks for perfect indoor seedling watering
These little adjustments will help you avoid the two biggest seedling killers—overwatering and leggy growth—while keeping your plants thriving.
The Mist Technique: When you're misting in Step 1, hold the spray bottle at least 6 inches above the seedlings to prevent water from splashing onto leaves. This keeps fungal diseases at bay while still delivering that ½-inch deep moisture we want. I've found that using a fine-mist setting (if your spray bottle has one) gives better control than a heavy spray, which can create puddles that seedlings hate.
Drainage Hack: In Step 2, if you're using containers without drainage holes, place a layer of pebbles or sand at the bottom before adding soil. This creates a natural drainage layer that mimics what you'd get with holes. I've seen growers use coffee filters or paper towels as makeshift drainage, but the pebble method actually improves airflow to the roots too.
Visual Moisture Check: For Step 3, here's what nobody tells you—healthy soil should look like a damp sponge, not a wet washcloth. If you're still unsure about that ¼-inch dry test, try this: gently squeeze a small handful of soil between your fingers. It should hold together but not be dripping wet. This tactile check is more reliable than just looking at the surface.
Seedling Stage Transition: The moment you reach Step 5 (4-5 true leaves), here's my pro tip: start your bottom-watering sessions in the morning. This gives seedlings all day to absorb moisture through their roots rather than just the soil surface. I've noticed seedlings transitioned this way develop stronger root systems and recover faster from any minor watering mishaps.
Pro Tips for Water Seedlings Indoors
- These little adjustments will help you avoid the two biggest seedling killers—overwatering and leggy growth—while keeping your plants thriving.
- The Mist Technique: When you're misting in Step 1, hold the spray bottle at least 6 inches above the seedlings to prevent water from splashing onto leaves.
- Drainage Hack: In Step 2, if you're using containers without drainage holes, place a layer of pebbles or sand at the bottom before adding soil.
Frequently asked questions
Got questions about keeping your indoor seedlings thriving? You’re not alone!
Here are answers to the most common concerns—from watering schedules to troubleshooting—so you can grow confidently without guesswork.
How often should I water seedlings indoors?
Check soil moisture daily—seedlings need water when the top half-inch feels dry. Overwatering is riskier than underwatering, so wait until the soil is slightly dry before misting or draining. Consistency is key: aim for every 1–3 days, adjusting for humidity (drier air = more frequent watering).
What’s the best time of day to water seedlings?
Morning is ideal! Watering between 8 AM and 10 AM gives seedlings time to absorb moisture before evening, reducing fungal risks. Avoid late-day watering, as damp leaves overnight can encourage mold. If you miss morning, early afternoon works—but never water after sunset.
Can I use tap water for seedlings?
Tap water is fine, but if it’s hard (high in minerals) or chlorinated, let it sit out for 24 hours before using. For best results, opt for room-temperature, filtered, or rainwater—seedlings are sensitive to cold or chemical residues. A quick fix? Use a spray bottle with distilled water for misting.
Why are my seedlings wilting even after watering?
Wilting can mean overwatering (root rot), underwatering, or poor drainage. Check the soil: if it’s soggy, let it dry out and repot if needed. If the soil is bone-dry, increase misting frequency. Also, ensure pots have drainage holes—seedlings hate “wet feet”! Yellow leaves or mushy stems? Time to troubleshoot drainage.
What if I don’t have a spray bottle or tray?
No problem! Use a clean, shallow container (like a muffin tin) to drain excess water, or water from the bottom by placing pots in a tray with ½ inch of water for 10–15 minutes. For misting, a repurposed spray bottle (even from the kitchen) works—just avoid soaking the soil. DIY hacks save the day!
Wrapping up and next steps
Growing seedlings indoors with the mist-and-drain method is all about patience and consistency—your little green friends will thank you with sturdy roots and vibrant growth! 🌱 By keeping the soil moist (not soggy) and ensuring proper drainage, you’re setting them up for success.
Remember, observation is key: adjust your watering as they grow.
Now that you’re armed with the know-how, why not expand your indoor garden? Try propagating a few more seedlings or experiment with different plants—your green thumb is just getting started! 🌟