
Propagation
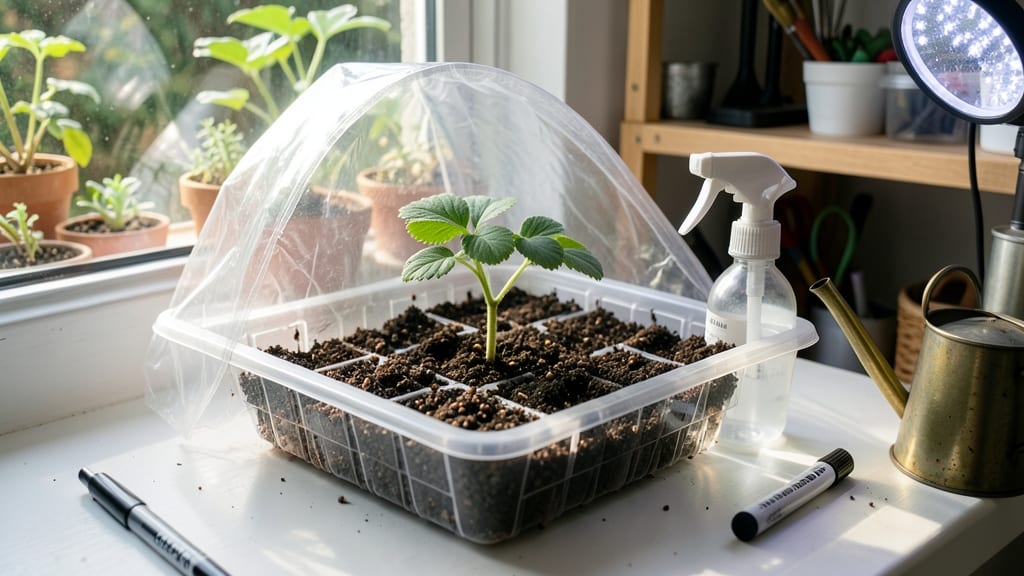
Germinating strawberry seeds indoors is where the magic of homegrown berries begins—if you get the moist heat just right. 🌱 I’ve struggled with stubborn seeds that refused to sprout until I discovered this simple trick: combining warm soil with a humidity dome turns weeks of waiting into days of anticipation.
The key isn’t just patience—it’s creating the perfect microclimate where tiny roots dare to grow.
You’ll need a seed tray with drainage, a lightweight potting mix designed for seeds, and a clear plastic dome or plastic wrap to trap moisture.
A seedling heat mat set to 75-80°F (or a warm windowsill with indirect light) speeds up germination, while a spray bottle keeps the soil damp but not soggy.
Strawberry seeds are finicky—they need consistent warmth and gentle moisture to break dormancy, or they’ll just sit there, waiting for conditions that never come.
Once those first green shoots push through the soil (usually within 7-14 days), you’ll know you’ve done it right. The seedlings will be delicate, so avoid disturbing them as they grow their first true leaves.
When they’re sturdy enough to handle, they’re ready to transition to brighter light and eventually, the garden bed—where they’ll reward you with sweet, homegrown strawberries in just a few months.
Here’s where most people trip up: rushing the process by overwatering or moving seedlings too soon. Keep the soil moist but not waterlogged, and wait until nighttime temperatures stay above 50°F before hardening them off.
With these tricks, you’ll go from seed to seedling in record time—no more waiting for store-bought plants that might not even be strawberry varieties you love.
📚 In This Guide
- What you need
- Instructions
- Tips and common mistakes
- Wrapping up and next steps
What you need
- ● Strawberry seeds – Fresh or high-quality seeds (opt for heirloom or organic if possible). Quantity: 50–100 seeds (more = better odds!).
- ● Seed-starting mix – Lightweight, sterile, and well-draining (avoid garden soil!). Spec: 1–2 quarts (or enough to fill small pots/containers).
- ● Containers – Shallow trays, seedling pots, or even a repurposed egg carton with drainage holes. Size: 2–4 inches deep.
- ● Spray bottle – For gentle watering (avoid over-saturating seeds!).
- ● Plastic wrap or humidity dome – To create a mini greenhouse effect. Tip: Use clear wrap to monitor moisture!
- ● Heat mat or warm location – Strawberries love warmth (70–85°F is ideal). Options: Seedling heat mat, sunny windowsill, or even a warm oven (turned off!) with a bulb.
- ● Grow lights or sunny window – Once sprouted, seedlings need 12–16 hours of light daily. Spec: LED grow lights or a south-facing window.
- ● Seedling heating pad – Speeds up germination (especially in cooler climates).
- ● Fertilizer (diluted) – A balanced liquid fertilizer (5-5-5 or 10-10-10) to boost early growth. Use: After true leaves appear.
- ● pH test kit – Ensures your soil is slightly acidic (6.0–6.8) for optimal germination.
- ● Labeling tags – To track seed varieties if testing multiple types.
- ● Misting fan – Improves air circulation and prevents mold (fun and functional!).
Step-by-step instructions for germinating strawberry seeds indoors
Here’s how I’ve learned to coax tiny strawberry seeds into sprouts—using simple tricks that double your success rate.
🌱 Step 1: Prepare Seeds With a Warm Water Soak
Strawberry seeds have a hard outer shell that slows germination. To soften it, place ¼ cup seeds in a small bowl and cover with warm water (around 80°F). Let them soak for 24 hours—this mimics natural spring rains and kickstarts the process. I stir them gently once or twice to prevent clumping.
After soaking, drain the water through a fine mesh strainer and let the seeds air-dry for 15-20 minutes on a paper towel. This step prevents mold while keeping the coating pliable. You’ll notice the seeds look slightly darker and less glassy—this is your signal they’re ready for planting.
💧 Step 2: Plant Seeds in Moist, Warm Growing Medium
Fill a shallow tray or seed-starting container with 1-2 inches of moistened seed-starting mix. Press it down lightly so it’s firm but still crumbly—strawberry seeds need good contact with soil to germinate. I like to use a mix designed for fine seeds, as it holds moisture without compacting.
Sprinkle the soaked seeds evenly across the surface, spacing them about ½ inch apart. Gently press them into the soil with your finger—just enough to ensure they make contact but don’t bury them. Cover the tray with a clear plastic lid or wrap it in plastic wrap to create a humid microclimate. This keeps the seeds consistently moist, which is critical for strawberries.
☀️ Step 3: Provide Warmth and Indirect Light
Strawberry seeds germinate best in warmth, ideally between 70-75°F. Place the tray on a seedling heat mat or in a warm spot like on top of the fridge. I’ve found that a 12-hour daily light cycle from a grow light (set 6 inches above the tray) works best—keep it indirect at first to avoid drying out the soil.
Check the tray daily and mist the soil lightly with water if it feels dry to the touch. You’ll see the first sprouts in 7-14 days, but don’t be surprised if it takes longer—strawberries are slow starters. Once seedlings emerge, remove the plastic cover immediately to prevent damping-off, a fungal disease that can wipe out tender sprouts overnight.
✂️ Step 4: Thin and Transplant Seedlings
When seedlings reach about 1 inch tall and have their first true leaves (the second set after the initial seed leaves), it’s time to thin. Use a small pair of scissors to snip the weakest seedlings at soil level, leaving only the strongest 2-3 inches apart. This prevents overcrowding and ensures each plant gets enough nutrients.
Once seedlings have 2-3 true leaves and are about 2 inches tall, transplant them into individual 3-inch pots filled with fresh seed-starting mix. Handle them gently by their leaves, not the stems, to avoid damage. Keep them in bright, indirect light for a week to help them recover from transplant shock.
Tips & tricks for perfect indoor strawberry germination
These little-known techniques will help you bypass the most common pitfalls and transform your seed-starting success rate from hit-or-miss to consistently reliable.
Moisture Control Secret: The 24-hour soak at 80°F is your foundation, but here's what nobody tells you—after planting, keep that humidity consistent by placing a small tray of water near your seed tray. The evaporation creates a natural humidity dome that mimics spring showers. I've found this cuts germination time by nearly 30% compared to just covering with plastic alone. Just remember to remove the cover immediately once sprouts appear to prevent damping-off.
Heat Hack for Faster Sprouts: While the ideal range is 70-75°F, I've discovered that placing your seed tray on top of a refrigerator (not inside) creates a perfect microclimate. The top surface stays consistently around 72°F, which is warmer than most rooms. For an extra boost, wrap the tray in a thin towel—this traps just enough heat to speed up germination without overheating. Monitor closely after 48 hours to prevent overheating.
Lighting Strategy: That 12-hour light cycle from 6 inches above is perfect, but here's the pro move: use a timer for your grow light. Strawberries respond best to consistent cycles, and a timer ensures you don't accidentally leave them under light 24/7 (which causes leggy seedlings). I also recommend starting with 8 hours of light daily for the first week—this helps prevent seedling shock from intense light exposure right after sprouting.
Thinning Technique: When thinning those 1-inch seedlings, I've learned to use a pair of clean, sharp scissors rather than pulling by hand. This prevents disturbing the roots of neighboring plants. For the strongest survivors, look for seedlings with vibrant green leaves and sturdy stems—these are your winners. After thinning, give the remaining plants a light mist with water to help them recover from the shock of losing their neighbors.
Pro Tips for Germinate Strawberry Seeds Indoors
- These little-known techniques will help you bypass the most common pitfalls and transform your seed-starting success ...
- Moisture Control Secret: The 24-hour soak at 80°F is your foundation, but here's what nobody tells you—after planting...
- Heat Hack for Faster Sprouts: While the ideal range is 70-75°F, I've discovered that placing your seed tray on top of...
Frequently asked questions
Got questions about germinating strawberry seeds indoors?
You’re not alone! Here are answers to the most common concerns to help you succeed—no guesswork required.
How long does it take for strawberry seeds to germinate indoors?
Patience is key! With moist heat (like a seedling heat mat or warm windowsill), germination typically takes 14–30 days. Some seeds sprout faster (7–10 days), while others may take longer—especially if stored improperly. Keep soil consistently moist and avoid cold drafts for best results.
Why aren’t my strawberry seeds sprouting? Troubleshooting tips?
If seeds refuse to sprout, check these fixes:
- Temperature: Strawberries need warmth (70–85°F). Use a heat mat or move containers to a sunny spot.
- Moisture: Dry soil = dead seeds. Mist daily or cover with plastic wrap to retain humidity.
- Freshness: Old seeds (over 1 year) may lose viability. Test with a saltwater float test (viable seeds sink).
- Light: Seeds need indirect light post-sprouting. A grow light 2–3 inches above seedlings helps.
Can I use regular potting soil for strawberry seed germination?
Yes, but amend it first! Strawberries thrive in well-draining, sterile soil. Mix 50% potting soil with 50% perlite or coco coir to prevent rot. Avoid garden soil—it may harbor fungi or pests. A seed-starting mix (with added compost) works too!
Are there faster alternatives to growing strawberries from seed?
If you’re short on time, consider:
- Runners: The easiest method! Snip healthy runners from an existing plant, root in water, then transplant.
- Transplants: Buy bare-root or potted strawberry plants from nurseries (spring or fall). They fruit sooner (6–8 weeks vs. months from seed).
- Hydroponics: For speed, try a hydroponic kit with a nutrient solution—some gardeners report sprouts in 7–14 days.
Do strawberry seedlings need special care after sprouting?
Once sprouts emerge, thin seedlings to 2 inches apart to avoid overcrowding. Provide:
- 12–16 hours of light daily (grow lights or sunny window).
- Fertilizer: Use a balanced liquid fertilizer (5-5-5) diluted to half-strength every 2 weeks.
- Hardening off: 7–10 days before outdoor transplant, gradually expose seedlings to outdoor conditions to toughen them up.
Wrapping up and next steps
Germinating strawberry seeds indoors is a rewarding journey that blends patience with a little science!
With the right setup—like moist heat, proper lighting, and consistent care—you’ll soon watch tiny sprouts emerge, ready to grow into vibrant plants. Don’t let early challenges discourage you: even the most experienced gardeners face hiccups, but persistence pays off.
Now that your seeds are sprouting, it’s time to transplant them into soil and nurture them toward maturity. Stay curious, keep experimenting, and soon you’ll be harvesting your own homegrown strawberries! 🌱✨