
Size
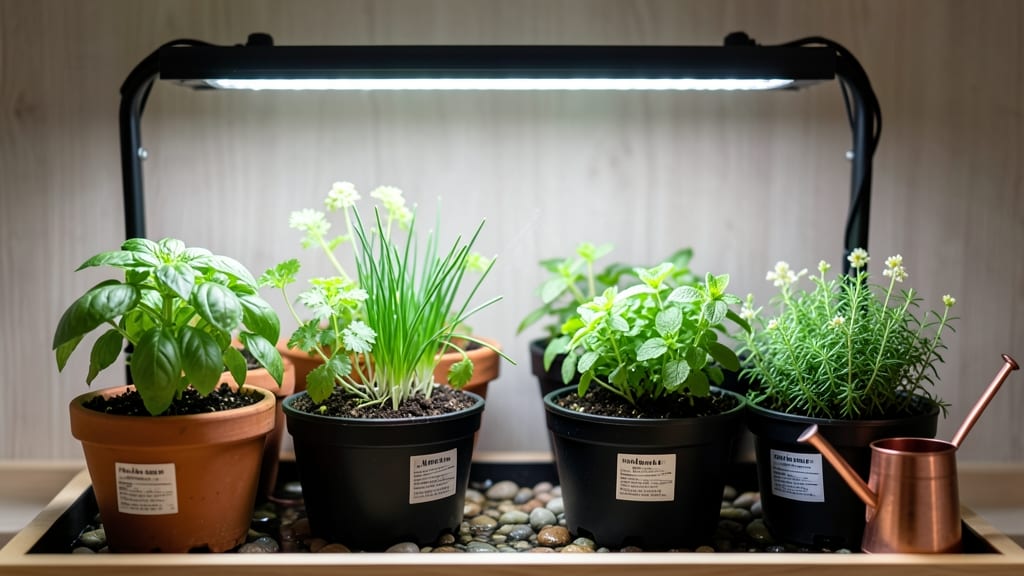
Growing herbs indoors with grow lights transforms your kitchen into a fragrant, productive garden—no sunny windowsill required. 🌿 I’ve turned my basement corner into a year-round herb factory using just a single LED light and a few simple rules, and you can too.
The secret isn’t expensive gear but matching light, water, and plant needs to create the perfect mini-climate.
Start with easygoing herbs like basil, parsley, or mint—they thrive under artificial light and forgive beginner mistakes. You’ll need a grow light (LED bulbs are energy-efficient and last years), a container with drainage, and a timer to simulate daylight.
Most herbs need 12-16 hours of light daily, and the right setup keeps them compact, leafy, and packed with flavor.
Within 6 weeks, you’ll harvest fresh basil for pesto, snip cilantro for salsas, and watch your plants grow thicker than store-bought bundles. The key is consistency—water when the top inch of soil feels dry, rotate plants weekly for even growth, and prune regularly to encourage bushiness.
No more wilted grocery store herbs or empty spice racks.
This method works year-round, even in dark apartments or cold climates. Once you master the basics, you can expand to harder herbs like dill or rosemary. Let’s get those lights shining and those herbs growing!
📚 In This Guide
- What you need
- Instructions
- Tips and common mistakes
- Wrapping up and next steps
What you need
- ● Grow lights: LED or fluorescent grow lights (12-16 hours of light/day). Specs: 20-40W for small setups, 50-100W for larger trays.
- ● Growing containers: 4-6" pots (or a shallow tray with drainage) for individual herbs. Quantity: 1 per herb plant.
- ● High-quality potting mix: Well-draining, seed-starting mix (avoid garden soil). Quantity: 1-2 gallons.
- ● Herb seeds or seedlings: Choose fast-growing varieties like basil, mint, or parsley. Quantity: 3-5 plants.
- ● Watering can or spray bottle: Gentle watering prevents over-saturation.
- ○ Timer (optional but helpful): For automating grow light schedules.
- ● Humidity dome or plastic wrap to retain moisture during germination.
- ● Fertilizer (balanced liquid or slow-release granules) for nutrient boosts.
- ● Drip tray to catch excess water and protect surfaces.
- ● Grow light stand or adjustable clamp for optimal positioning.
Step-by-step instructions for growing herbs indoors with grow lights
Here's how to cultivate vibrant, flavorful herbs year-round using just a few simple tools and consistent care.
🪴 Step 1: Select and Prepare Containers for Optimal Drainage
Choose 4-inch diameter pots with drainage holes—herbs despise soggy roots. Terra cotta works best because it breathes and wicks away excess moisture. If your pots lack holes, drill 2-3 additional ones near the bottom to prevent waterlogging. Place a small piece of mesh or broken pottery over each hole to keep soil from escaping while allowing water to drain freely.
Fill each pot with 2 cups of well-draining potting mix—never garden soil, which compacts and suffocates roots. I like to blend standard potting mix with 20% perlite for extra aeration. Press the soil down gently until it's firm but not packed, creating a stable base for your herbs to establish roots.
🌱 Step 2: Plant Seeds or Transplants at the Right Depth
For seeds, follow packet instructions for depth—typically twice the seed diameter. Basil, parsley, and chives germinate easily from seed, while rosemary and thyme often perform better as established plants. If using transplants, dig a hole the same depth as the root ball and place the herb gently into the soil. Firm the soil around the base to eliminate air pockets.
Water immediately after planting to settle the soil and encourage root contact. Use a spray bottle for seeds to avoid displacing them, and water at the base for transplants to prevent leaf damage. Keep the soil evenly moist but not soggy—herbs like basil and cilantro need consistent moisture, while rosemary and oregano tolerate slightly drier conditions.
☀️ Step 3: Position Grow Lights for Maximum Growth
Place your herbs under a full-spectrum LED grow light positioned 2-4 inches above the tallest leaves. Herbs need 14-16 hours of light daily, so set a timer to automate the cycle—most grow lights come with built-in timers for convenience. Adjust the light height as your herbs grow to maintain that 2-4 inch gap, which prevents leggy, stretched growth.
Watch for pale or elongated stems—this means the light is too far away. Strong, healthy herbs have deep green leaves and compact spacing between nodes. If your herbs lean toward the light, rotate the pots a quarter turn daily to encourage even growth. Avoid placing herbs directly under the light at first; let them acclimate gradually to prevent leaf burn.
💧 Step 4: Maintain Ideal Moisture and Humidity Levels
Water when the top inch of soil feels dry to the touch, but avoid letting the soil dry out completely—herbs like basil and cilantro wilt quickly when thirsty. Use room-temperature water to prevent shocking the roots, and water at the base to keep leaves dry, which reduces the risk of fungal diseases like powdery mildew.
Mist the leaves occasionally to maintain 40-60% humidity, especially for herbs like basil and mint. A small humidifier or pebble tray beneath the pots helps create the right environment. Overwatering is the most common mistake—yellowing leaves or mushy stems are signs of too much moisture. If you notice wilting, check the soil moisture before watering again.
✂️ Step 5: Prune and Harvest for Bushier Growth
Start harvesting 2-3 weeks after planting, once the plants have at least 3-4 sets of true leaves. Pinch back the tips of basil, parsley, and cilantro to encourage bushier growth—this redirects energy from flowering to leaf production. Use clean, sharp scissors or fingers to snip just above a leaf node, leaving at least half the plant intact to keep it productive.
Harvest regularly to prevent bolting (flowering), which makes leaves bitter and reduces yield. Rosemary and thyme can be trimmed more aggressively since they're woody herbs, but avoid cutting into old wood. After each harvest, give the plants a light watering to replenish moisture lost during pruning. You'll see new growth within 5-7 days, signaling that your herbs are thriving under the grow lights.
Tips & tricks for thriving indoor herb gardens
Here's what nobody tells you about keeping your herbs lush and productive under grow lights.
Container Selection: Terra cotta pots aren't just traditional—they're essential. Their porous nature helps regulate moisture levels perfectly for herbs, preventing both waterlogging and drought stress. If you're using plastic containers, drill extra drainage holes and consider adding a layer of gravel at the bottom to improve airflow. The 4-inch diameter is ideal because it gives roots enough space without overwhelming your growing setup.
The Light Factor: That 2-4 inch distance from your grow light isn't arbitrary—it's the sweet spot for optimal photosynthesis without burning. I've seen beginners place lights too far away, resulting in leggy, pale herbs that never develop proper flavor. Use a ruler to measure and adjust weekly as your herbs grow. Pro tip: If your herbs start leaning toward the light, you're too close—move it up immediately.
Soil Science: The 20% perlite addition isn't just about aeration—it creates tiny air pockets that prevent soil compaction. I blend my potting mix with perlite and a handful of worm castings for extra nutrients. For Step 1, press the soil firmly but don't pack it like dirt in a garden; you want it to hold its shape but still allow water to penetrate easily. This balance is what keeps roots healthy and prevents water from sitting at the bottom of your pots.
Harvesting Strategy: When you start harvesting those 3-4 sets of true leaves, remember this: always cut just above a leaf node where new growth emerges. This encourages branching and prevents your herbs from becoming tall and spindly. I harvest my basil every 2-3 weeks, and it grows back bushier each time. For woody herbs like rosemary, you can be more aggressive with pruning—just avoid cutting into old, hardened stems.
Pro Tips for Growing Herbs Indoors With Grow Lights
- Here's what nobody tells you about keeping your herbs lush and productive under grow lights.
- Container Selection: Terra cotta pots aren't just traditional—they're essential.
- The Light Factor: That 2-4 inch distance from your grow light isn't arbitrary—it's the sweet spot for optimal photosynthesis without burning.
Frequently asked questions
Got questions about growing herbs indoors with grow lights? You’re not alone! Here are some of the most common concerns—and straightforward answers to help you succeed.
What’s the best type of grow light for indoor herbs?
LED grow lights are the top choice for herbs—they’re energy-efficient, emit minimal heat, and provide the full-spectrum light (blue for growth, red for flowering) your plants need. Avoid cheap incandescent bulbs; they won’t cut it! For small setups, a 10-20W LED panel works perfectly.
How long should I keep grow lights on each day?
Herbs thrive with 12–16 hours of light daily. Use a timer to automate this—consistency is key! Most herbs prefer 14 hours of light, but leafy greens like basil can handle 12. Just mimic natural daylight cycles to avoid leggy or weak plants.
Can I grow herbs indoors without grow lights?
Yes, but with limitations! Place your herbs near a south-facing window (6+ hours of direct sunlight) or use a bright artificial light (like a daylight LED bulb). However, grow lights give you full control over light quality and duration, leading to faster, healthier growth—especially in low-light spaces.
Why are my herbs turning yellow or leggy with grow lights?
Yellowing leaves often mean overwatering or nutrient deficiency, while leggy stems signal too little light or stretching for more. Adjust your light distance (keep it 6–12 inches above plants) and reduce watering. A balanced liquid fertilizer every 2–4 weeks can also help!
Do grow lights get too hot for herbs?
Most modern LED grow lights stay cool, but if your herbs wilt or leaves crisp, the light is too close. Keep it 6–12 inches away and monitor for heat stress. If using high-wattage bulbs, add a small fan for airflow—herbs like basil and parsley prefer 65–75°F.
Wrapping up and next steps
Growing herbs indoors with grow lights isn’t just a trend—it’s a game-changer for fresh flavors, year-round greens, and a touch of nature in your home! 🌱 With the right setup, you can enjoy harvests in as little as 6 weeks, saving money and reducing waste.
Whether you’re a seasoned gardener or a curious beginner, this method makes it easy to grow basil, mint, parsley, and more—no outdoor space required.
Ready to take the next step? Start small with 1-2 herbs, experiment with light schedules, and watch your indoor garden thrive. Soon, you’ll be clipping fresh herbs for meals like a pro—one leaf at a time! 🌿