
Succulent
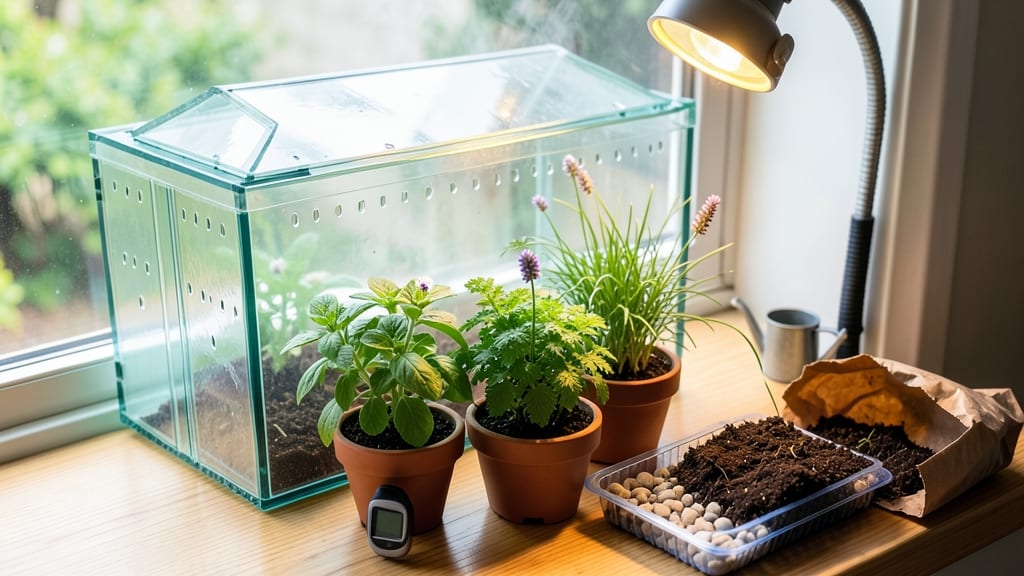
A DIY mini greenhouse indoor for your succulents can turn even a dim corner into a thriving jungle. 🌱 I built mine after my snake plants started stretching toward the window—now they’re bushier than ever, all thanks to this simple setup that traps warmth and humidity where my apartment lacks both.
You’ll need just five basic supplies: a clear plastic storage bin (or a repurposed fish tank), a spray bottle for misting, a small fan for airflow, and some pebbles to create a drainage layer.
The whole project takes under 30 minutes, and the best part? Your plants will thank you with faster growth and fewer pests. Even my black thumb can’t kill these now.
Inside, your succulents will develop thicker leaves and brighter colors as they bask in the trapped warmth—perfect for windowsills that get only a few hours of light.
The humidity also keeps them plump, so those wrinkled leaves become a thing of the past. Plus, it’s a great way to propagate cuttings year-round.
Works for any indoor space, from tiny apartments to sunroom corners. Just avoid sealing it completely—succulents still need airflow to prevent rot. Ready to give it a try? Here’s how to assemble it without breaking the bank.
📚 In This Guide
- What you need
- Instructions
- Tips and common mistakes
- Wrapping up and next steps
What you need
- ● Clear plastic storage bin (18" x 12" x 6") – Look for one with a tight-fitting lid (e.g., Sterilite or Rubbermaid).
- ● Drill with small bit (1/8" or 1/16") – For creating ventilation holes.
- ● Spray bottle (8 oz.) – For misting and humidity control.
- ○ Small fan (optional, 3"-4") – Improves air circulation (USB-powered works great!).
- ○ LED grow light (optional, 5W-10W) – If your space lacks natural light (full-spectrum preferred).
- ● Succulents (3-5 small plants) – Choose low-light varieties like Haworthia, Sedum, or Echeveria.
- ● Pebbles or perlite (1-2 cups) – For drainage at the bin’s base.
- ● Cactus/succulent soil mix (2-3 cups) – Avoid regular potting soil (it retains too much moisture).
- ● Rubbing alcohol or vinegar – For sterilizing tools and surfaces.
- ● Measuring tape or ruler – Ensures precise hole placement.
- ● Hygrometer – Monitors humidity levels (ideal: 40-60%).
- ● Mini thermometer – Keeps temps between 65°F–75°F.
- ● Decorative rocks or moss – Adds aesthetic appeal and moisture retention.
- ● Humidifier (small, portable) – Helps maintain humidity in dry climates.
- ● Clear acrylic sheet (thin, 1/8") – Replaces the lid for a sleeker look (cut to size).
Step-by-Step instructions for building a DIY mini greenhouse
Here's how to create a cozy, low-light sanctuary where your succulents will thrive year-round.
🪴 Step 1: Choose and Prepare Your Container
Start with a clear plastic storage bin (at least 12 inches deep) or a glass terrarium with a lid. I like using 18-inch square bins because they give plants room to grow while keeping humidity high. Clean the container thoroughly with rubbing alcohol to remove any residue that could harm your plants.
Add a 2-inch layer of small gravel or pebbles at the bottom for drainage. This prevents root rot by keeping excess water away from the soil. Tap the container gently on the table to settle the gravel evenly—this ensures proper drainage without gaps.
🌱 Step 2: Layer Soil and Plant Your Succulents
Fill the container halfway with a cactus and succulent mix—this lightweight soil drains quickly and prevents soggy roots. Press it down lightly so it’s firm but not compacted. You’ll want 4-6 succulents for a balanced look, spacing them 2-3 inches apart to allow airflow.
Dig small holes just deep enough to cover the succulent’s base, then place each plant gently. Avoid burying the leaves—succulents store water in their leaves, and buried foliage can rot. Water lightly after planting to settle the soil around the roots.
☀️ Step 3: Create the Humidity-Dampening Lid
Cover the container with plastic wrap or a clear plastic lid to trap humidity. If using wrap, secure it tightly with rubber bands or clips—you want a snug seal to mimic a greenhouse environment. Place the greenhouse in bright, indirect light (a north-facing window works best for low-light conditions).
Succulents need bright but not direct sunlight to avoid scorching. If leaves start turning pale or stretching, move it 1-2 inches closer to the light source. You’ll know the humidity is right when tiny water droplets form on the plastic—this means condensation is building, which is perfect for succulents.
💧 Step 4: Water and Monitor for Balance
Water only when the top inch of soil feels completely dry—this usually means every 2-3 weeks. Overwatering is the biggest killer of succulents, so I use a spray bottle to mist lightly rather than pouring water directly. Let excess water drain completely before sealing the container again.
Check for yellowing leaves or soft stems—these are signs of overwatering. If you see condensation inside but the soil is still damp, open the lid for 24 hours to let moisture escape. Succulents in a greenhouse need less water than those in open pots because the enclosed space retains humidity longer.
⏰ Step 5: Ventilate and Maintain Long-Term
After 2-3 weeks, start daily ventilation by lifting the lid for 10-15 minutes to prevent mold or fungal growth. I do this in the morning when humidity is lowest. Succulents need fresh air but still benefit from the greenhouse’s humidity, so don’t leave it open long.
Rotate the greenhouse quarter-turn weekly so all plants get even light exposure. You’ll notice new growth within 4-6 weeks—that’s your sign the greenhouse is working! Prune leggy stems by pinching back the tips to encourage bushier growth, and repot every 12-18 months when roots fill the container.
Tips & tricks for perfect DIY mini greenhouse indoor
Here's what nobody tells you about creating the ideal low-light environment for your succulents.
Container Selection: For best results, choose containers with slightly textured sides—like a glass terrarium with ridges or a plastic bin with ribbed walls. This helps roots cling better during the quarter-turn weekly rotation (Step 5). I've found that 18-inch square bins work perfectly because they provide enough surface area for airflow while maintaining humidity. If using plastic wrap as a lid, opt for heavy-duty plastic wrap—it creates a better seal than regular wrap and lasts longer.
Soil Prep Technique: In Step 2, when adding your cactus and succulent mix, press it down firmly but don't compact it completely. Think of it like fluffing a pillow—you want it to be snug enough to support plants but still allow water to drain quickly. A helpful trick is to sprinkle a thin layer of perlite or coarse sand on top of the soil before planting. This extra layer prevents soil from splashing onto leaves when you water, keeping your succulents cleaner and healthier.
Light Monitoring: The instructions mention bright but indirect light, but here's the secret: succulents actually tell you when they're getting enough light. Watch for vibrant green leaves with no signs of stretching (that's called etiolation). If you notice leaves turning pale or developing a reddish tint, move your greenhouse closer to the light source by 1-2 inches. Conversely, if leaves develop brown spots or look crispy, it's getting too much direct sun—move it back slightly. This visual cue system is more reliable than guessing.
Ventilation Timing: After those crucial 2-3 weeks when you start daily ventilation, here's a pro move: use a small fan placed about 6 inches away from your greenhouse for 5 minutes during your morning ventilation. This gentle airflow mimics natural breezes and helps prevent mold spores from settling. Just make sure the fan isn't blowing directly onto the plants—you want circulation, not a wind tunnel! This little trick has kept my greenhouses mold-free for years.
Pro Tips for Diy Mini Greenhouse Indoor
- Here's what nobody tells you about creating the ideal low-light environment for your succulents.
- Container Selection: For best results, choose containers with slightly textured sides—like a glass terrarium with rid...
- Soil Prep Technique: In Step 2, when adding your cactus and succulent mix, press it down firmly but don't compact it ...
Frequently asked questions
Got questions about creating your own DIY mini greenhouse indoor for succulents? You’re not alone! Here are answers to the most common queries—from setup hiccups to long-term care. Let’s grow those green babies with confidence!
How do I control humidity inside a DIY greenhouse without mold?
Succulents thrive in low humidity (30-50%). Use a small fan on low for airflow, avoid overwatering, and add a silica gel packet or charcoal to absorb excess moisture. Ventilate daily by lifting the lid for 10-15 minutes. Pro tip: Skip misting—it’s a mold magnet!
How long does it take to see growth in a mini greenhouse?
Patience is key! With proper light (6+ hours/day), you’ll spot new growth in 4-6 weeks. Slow starters? Check for underwatering (succulents prefer dry soil) or insufficient light. If using artificial grow lights, ensure they’re 6-12 inches from plants.
Can I use a DIY greenhouse for other plants besides succulents?
While designed for succulents, mini greenhouses work for herbs (basil, mint), seedlings, or low-light plants like pothos. Just adjust care: Herbs need more water; seedlings benefit from higher humidity (add a tray of pebbles + water). Avoid tropical plants—they’ll overheat!
What if my DIY greenhouse fogs up or gets condensation?
Fogging = high humidity. Fix it by:
- Improving airflow: Poke tiny holes in the lid or add a small vent.
- Reducing water: Let soil dry completely between waterings.
- Adjusting placement: Move away from steamy spots (like kitchens).
Do I need special lighting for a DIY greenhouse?
Not always! If your space gets 4+ hours of bright, indirect light (e.g., near a south-facing window), natural light suffices. For darker rooms, use LED grow lights (12-16 hrs/day) or a sunlight lamp. Avoid incandescent bulbs—they generate too much heat.
How often should I clean my mini greenhouse?
Spot-clean weekly (wipe leaves with a damp cloth) and deep-clean monthly:
- Remove plants, soak containers in soapy water.
- Disinfect surfaces with rubbing alcohol (70%) or vinegar.
- Let dry completely before replanting.
Wrapping up and next steps
Building your own DIY mini greenhouse indoors is a rewarding way to create a thriving haven for your succulents—even in low-light spaces! 🌱 With just a few budget-friendly materials and a little creativity, you’ve unlocked a controlled environment that promotes growth, minimizes pests, and maximizes humidity.
Whether you’re a beginner or a seasoned plant parent, this project proves that small spaces can yield big results.
Ready to watch your succulents flourish? Take the next step: Start with one small greenhouse and experiment with different plants or lighting conditions. Before you know it, you’ll be expanding your setup—and maybe even sharing your green thumb with friends! 🌿