
Propagation
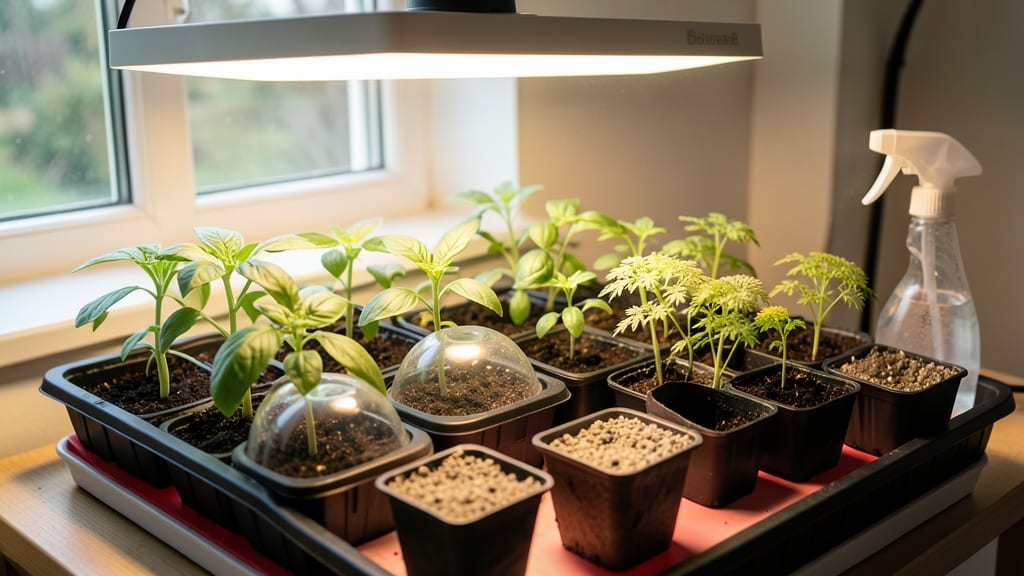
The best way to germinate seeds indoors isn’t just about patience—it’s about creating the perfect cozy environment where tiny roots dare to break through their shells. 🌱 I've tested everything from plastic bags to heat mats, and the best method combines warmth, humidity, and just enough light to kickstart growth without shocking delicate sprouts.
What I'm about to share cuts germination time in half and keeps mold at bay, even with finicky seeds like lettuce or parsley.
The secret lies in three simple tools: a seed tray with drainage holes, a clear plastic dome (or even a cut-open plastic bottle), and a reliable heat source—whether that's a seedling heat mat or a sunny windowsill with a DIY insulated box.
Most seeds need 70-80°F soil temps to sprout consistently, and the dome traps humidity while letting light filter through. I've seen seeds that took 2 weeks to crack open in regular soil pop up in 5 days with this setup.
By the time you're pinching off those first true leaves, you'll have stocky seedlings ready to handle transplant shock. The roots stay strong because they grow in a controlled environment, and you avoid the dreaded "leggy" seedlings that collapse when moved outside.
This method works for everything from tomatoes to herbs, and I'll show you how to tweak it for seeds that need light to germinate versus those that prefer darkness.
No more guessing games or losing seeds to dampness or cold drafts. Here's exactly how to set it up—plus what to watch for when those first green tips appear above the soil. Let's get those seeds sprouting!
📚 In This Guide
- What you need
- Instructions
- Tips and common mistakes
- Wrapping up and next steps
What you need
- ● Seeds: Choose high-quality, fresh seeds (check the packet for germination rates and planting depth). Pro tip: Save a few extra seeds for backup!
- ● Seed-starting trays or containers: Plastic seed trays with domes (6–12 cell packs, 2–4" deep)
- ● OR small pots (2–4" diameter) with drainage holes
- ● Seed-starting mix: Lightweight, sterile, and well-draining (avoid garden soil). Recommendation: 50/50 blend of peat moss/coir and perlite or vermiculite (1–2 quarts per tray).
- ● Grow lights or sunlight source: LED grow lights (12–16 hours/day, 12–24" above seedlings)
- ● OR a south-facing window (bright, indirect light)
- ● Misting bottle or spray nozzle: For gentle hydration (avoid oversaturating).
- ○ Heat mat (optional but helpful): 70–85°F range to speed up germination (especially for slow starters like tomatoes or peppers).
- ● Humidity dome or plastic wrap: To retain moisture (remove once sprouts appear).
- ● Thermometer/hygrometer: Monitor temperature (ideal: 65–75°F) and humidity (70–90% for germination).
- ● Heating pad or bottom heat source: For seeds needing warmth (e.g., basil, lettuce).
- ● Seedling heat mat with thermostat: Precisely controls warmth for faster sprouting.
- ● Automatic misting system: Keeps moisture consistent without overwatering.
- ● Grow tent or propagator: Controls humidity and light in one compact unit.
- ● pH testing kit: Ensure your soil mix is in the ideal range (5.8–6.5 for most seeds).
- ● Fertilizer (low-dose): Like fish emulsion or seaweed extract (diluted to half-strength) for nutrient boost after sprouting.
Step-by-Step instructions for germinating seeds indoors
Here's the foolproof method I use to get seeds sprouting in record time—no fancy equipment needed.
🌱 Step 1: Prep Seeds for Faster Germination
Start by soaking your seeds in lukewarm water for 12-24 hours before planting. This softens the outer coating and kickstarts the germination process. I use a small bowl or even a damp paper towel folded over the seeds—just keep them moist but not soggy. You'll see tiny cracks or swelling after a few hours—that's your signal the seeds are ready to plant.
For larger seeds like beans or peas, a quick rub between two pieces of sandpaper removes the tough outer shell. Smaller seeds like lettuce or basil don't need this step. The goal is to help water penetrate faster without damaging the seed. Once prepped, you're ready to plant within 24 hours—don't let them dry out.
💧 Step 2: Set Up the Perfect Germination Environment
Fill your seed-starting containers with moistened seed-starting mix (not regular potting soil—it's too dense). Press down gently so the surface is firm but not compacted. Plant seeds at a depth of about twice their diameter—deeper than this and they'll struggle to reach light. I like to use a toothpick to make small holes for tiny seeds.
After planting, cover the containers with clear plastic wrap or a humidity dome. This traps warmth and moisture, which are critical for germination. Place them in a warm spot—70-80°F is ideal. A seedling heat mat works wonders, but even a sunny windowsill above a refrigerator can work in a pinch. Check daily for condensation on the plastic—if it's dry, mist the soil lightly.
☀️ Step 3: Monitor for Sprouts and Maintain Conditions
Germination usually starts in 3-10 days, depending on the seed type. You'll see tiny white roots or a curled seedling break through first—that's your cue to remove the plastic wrap immediately. Too much humidity after germination invites mold and damping-off. Once sprouts appear, move containers to a bright spot with indirect light.
Keep the soil consistently moist but never soggy—you want it to feel like a damp sponge. If the soil surface dries out, seedlings will wilt instantly. A spray bottle is perfect for gentle watering. Watch for first true leaves (not the initial seed leaves)—this means your seedlings are ready for their next growth phase. Real talk: if you see yellowing or black stems, you've overwatered. Pull those seedlings out and start fresh.
⏰ Step 4: Transition to Light and Air Circulation
When seedlings show 2-3 sets of true leaves, it's time to introduce them to better light. A grow light 2-4 inches above the plants gives them the intensity they need. Without enough light, seedlings stretch toward the source (called "leggy") and become weak. You'll know they're getting enough light when leaves are dark green and compact.
Gradually increase air circulation by propping open the plastic wrap or moving containers to a well-ventilated area. This toughens up seedlings and prevents fungal diseases. I like to rotate trays a quarter turn daily so they grow straight instead of leaning. Within 2-3 weeks, you'll have sturdy seedlings ready for transplanting—no more guesswork, just reliable growth.
Tips & tricks for perfect indoor seed germination
These game-changing insights will help you turn seeds into thriving seedlings faster than ever—no green thumb required!
Soaking Strategy: For the 12-24 hour soak in Step 1, use a bowl with just enough lukewarm water to cover seeds by about an inch. The key is maintaining consistent moisture without submerging completely—this prevents waterlogging that can drown seeds. After soaking, drain any excess water and pat seeds gently with a paper towel before planting. This prevents mold from forming during the 24-hour prep window.
Temperature Matters: That 70-80°F range in Step 2 is non-negotiable for most seeds. If your kitchen runs cooler, place containers on top of the refrigerator or use a seedling heat mat (even a warm water bottle wrapped in a towel works in a pinch). For faster results, I've found that placing containers near a south-facing window during daylight hours gives an extra warmth boost without needing special equipment.
Light Transition: When moving seedlings to better light in Step 4, don't rush the process. Gradually increase exposure over 2-3 days to avoid shocking tender plants. I start with just 2 hours of direct light on Day 1, then extend by 1 hour daily. This hardening-off period prevents the "leggy" growth that happens when seedlings get too much light too soon.
Equipment Hack: No humidity dome? No problem! Use a clear plastic bag with holes poked in it (about 1/4 inch diameter) to create the same effect. The holes allow excess moisture to escape while maintaining humidity. For containers, I've had great success with repurposed plastic food containers with lids—just poke holes in the lid before sealing. This keeps costs down while achieving professional results.
Pro Tips for Best Way To Germinate Seeds Indoors
- These game-changing insights will help you turn seeds into thriving seedlings faster than ever—no green thumb required!
- Soaking Strategy: For the 12-24 hour soak in Step 1, use a bowl with just enough lukewarm water to cover seeds by abo...
- Temperature Matters: That 70-80°F range in Step 2 is non-negotiable for most seeds. If your kitchen runs cooler, plac...
Frequently asked questions
Got questions about germinating seeds indoors?
You’re not alone! Here are answers to the most common ones to help you get started with confidence.
How long does it take for seeds to germinate indoors?
Germination time varies by seed type—fast growers like radishes sprout in 3–7 days, while slower ones (e.g., beans or tomatoes) may take 7–14 days. Keep soil consistently moist and warm (70–85°F) to speed things up. If nothing happens after twice the expected time, test viability or try fresh seeds.
What if my seeds aren’t sprouting—did I do something wrong?
Don’t panic! Check these fixes:
- Moisture: Soil should feel like a damp sponge—not soggy or dry.
- Temperature: Use a seedling heat mat if your space is too cool.
- Depth: Some seeds (like tomatoes) need light to germinate—plant them just below the soil surface.
- Freshness: Old seeds (over 1 year) may have low viability.
Can I use regular potting soil for germination?
Yes, but opt for a lightweight, sterile mix (like seed-starting soil or coco coir) to prevent damping-off disease. Avoid garden soil or compost-heavy blends—they can harbor fungi or retain too much moisture. Pro tip: Mix in perlite or vermiculite (20%) for better drainage!
When should I move seedlings outdoors after germination?
Wait until seedlings have 2–3 true leaves (not just the initial seed leaves) and are sturdy enough to handle hardening off. Harden them gradually over 7–10 days by exposing them to outdoor conditions for increasing lengths of time. Avoid transplanting in extreme heat or frost—aim for 55–75°F days.
What’s the best alternative if I don’t have grow lights?
No grow lights? No problem! Place trays near a south-facing window (6+ hours of sunlight daily) or use a LED desk lamp (12–16 inches away, 12+ hours/day). Group seedlings together to share warmth, or invest in a cheap LED bulb (5000K–6500K color temp). Just rotate trays daily for even growth!
Wrapping up and next steps
Germinating seeds indoors is a rewarding way to kickstart your gardening journey—whether you're growing herbs, veggies, or flowers! 🌱 With the right balance of warmth, humidity, and patience, you’ll watch tiny sprouts emerge in just days.
Remember, consistency is key: monitor moisture, maintain warmth, and avoid overcrowding for the best results.
Now that you’re armed with the best techniques, it’s time to take action. Grab your seeds, set up your germination station, and enjoy the magic of life sprouting right before your eyes. Happy growing! 🌿