
Propagation
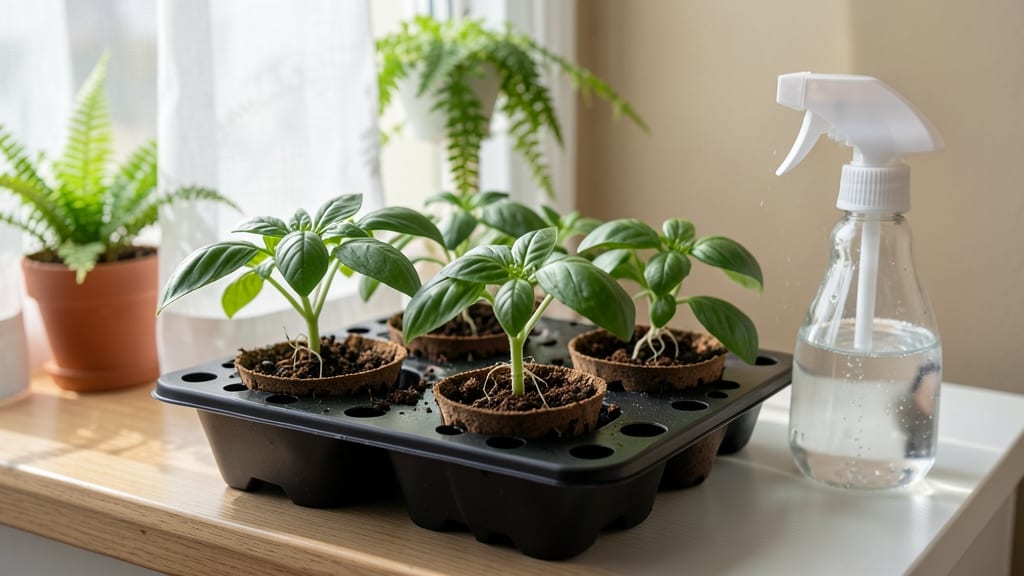
Growing basil from seed indoors lets you harvest fresh, fragrant leaves year-round—no greenhouse needed. 🌱 I’ve turned my kitchen windowsill into a productive herb garden, and you can too with just a few supplies and the right technique.
The secret isn’t complicated: it’s about matching basil’s natural needs to your indoor space.
You’ll need a shallow container (like a seed tray or even a recycled takeout box), well-draining potting mix, and a sunny spot—at least 6 hours of light daily.
Basil seeds are tiny but mighty; plant them just under the soil surface and keep them moist until sprouts appear in 7-14 days. A spray bottle works best to avoid disturbing the seeds.
Once your seedlings emerge, they’ll need bright light (a grow light helps if your window isn’t sunny enough) and consistent moisture—never let the soil dry out completely. Pinch the tops when they’re 4-6 inches tall to encourage bushier growth, and you’ll start harvesting leaves in just 4-6 weeks.
The smell alone is worth the effort!
Troubleshooting is easy: leggy seedlings mean more light, and yellow leaves usually signal overwatering. With proper care, your basil will thrive indoors for months, giving you fresh herbs for pesto, salads, or teas anytime. Ready to grow?
📚 In This Guide
- What you need
- Instructions
- Tips and common mistakes
- Wrapping up and next steps
What you need
- ● Basil seeds: 1 packet (50–100 seeds, organic preferred for flavor). Pro tip: Look for varieties like Genovese or Sweet Basil for classic taste!
- ○ Seed-starting trays or small pots: 2–4 (2–3 inches deep) with drainage holes. Optional: Biodegradable peat pots for easy transplanting.
- ● Seed-starting mix: 1–2 cups of lightweight, sterile potting soil (avoid garden soil—it’s too dense!).
- ● Spray bottle: 1 (for gentle watering). Pro tip: A misting nozzle keeps seeds from washing away!
- ● Plastic wrap or humidity dome: 1 sheet (to retain moisture while seeds germinate).
- ● Grow lights or sunny windowsill: A south-facing window (6+ hours of sunlight daily) or a LED grow light (12–16 hours/day if natural light is limited).
- ● Watering can or cup: 1 (for post-germination care).
- ● Heating mat: 1 (speeds up germination by 2–3 days in cooler climates).
- ● Fertilizer: Balanced liquid fertilizer (5-5-5 or 10-10-10, diluted to half-strength) for when seedlings sprout.
- ● Pruning shears: 1 pair (for pinching back stems to encourage bushier growth).
- ● Labels & markers: To track planting dates and varieties.
Step-by-step instructions for growing basil from seed indoors
Here's how I grow vigorous basil plants that thrive on my windowsill—no grow lights needed.
🌱 Step 1: Prepare Containers and Seed Starting Mix
Use 4-inch diameter pots with drainage holes to give each basil plant room to develop strong roots. Fill each pot with a sterile seed-starting mix—never garden soil, which compacts and suffocates tender seedlings. I press the mix down lightly until it's firm but not packed, then water it until moisture reaches the bottom without pooling.
Here's the thing—basil seeds are tiny, so I use a toothpick to create a shallow indentation in the soil surface. This keeps seeds from washing away when I water. Place 2-3 seeds per pot at a depth of ¼ inch, then cover with a sprinkle of additional mix. The goal is to bury them just enough to keep them from drying out but not so deep that they struggle to emerge.
💧 Step 2: Create Ideal Germination Conditions
Basil seeds need warmth and moisture to germinate. I place the pots in a seedling heat mat set to 75-80°F and cover them with a clear plastic dome or plastic wrap to trap humidity. Without this, germination can take 2-3 weeks—with warmth, you'll see sprouts in 5-7 days.
Check daily but resist watering until you see condensation on the inside of the dome. This tells me the humidity level is perfect. Once 50% of seeds have sprouted, remove the dome immediately. Leaving it on too long creates a damp environment that invites damping-off disease, which kills seedlings overnight by rotting their stems at the soil line.
☀️ Step 3: Provide Bright, Indirect Light
The moment those first true leaves appear (not the initial seed leaves), move the pots to a south-facing windowsill where they'll receive 6+ hours of bright, indirect light daily. Basil needs light to grow compact and flavorful—without enough, stems stretch weakly and leaves develop a pale, leggy appearance.
I rotate the pots a quarter turn daily so plants grow evenly toward the light. Watch for leaves touching the glass—this means the light is too intense. If you see brown spots or crispy edges, move the pots back 6-12 inches from the window. You'll know the light is perfect when leaves are deep green and stems remain sturdy.
🌿 Step 4: Thin and Maintain Moisture
Once seedlings have 2-3 sets of true leaves, thin to the strongest plant per pot by snipping the weaker stems at the soil line with clean scissors. This prevents overcrowding and gives the remaining plant plenty of nutrients. Water gently at the base, avoiding the leaves—wet foliage encourages fungal diseases.
Keep the soil consistently moist but not soggy. I check by sticking my finger 1 inch deep—if it feels dry, it's time to water. Overwatering is the #1 killer of basil seedlings, so I let the top inch dry out between waterings. You'll see new leaves emerge within a week—that's your signal everything is working.
✂️ Step 5: Prune for Bushier Growth and Harvest
When plants reach 6 inches tall, pinch off the top set of leaves just above a pair of lower leaves. This encourages the plant to branch out, giving you more harvests. I repeat this pruning every 4-6 weeks to maintain a bushy shape and prevent the plant from flowering too soon—once basil flowers, the leaves become bitter.
Harvest leaves as needed by snipping just above a leaf pair with clean scissors. Regular harvesting actually stimulates more growth. You'll know you're doing it right when the plant stays compact and keeps producing fresh leaves. With proper care, my basil plants keep producing for 6-8 months before needing replacement.
Tips & tricks for perfect indoor basil growth
These game-changing strategies will help you avoid the most common pitfalls when growing basil from seed indoors.
Container Selection: While 4-inch pots work perfectly, consider using biodegradable pots made from coconut coir or peat. These can be planted directly into your garden later without disturbing the roots. If you choose plastic pots, ensure they have drainage holes—this prevents root rot, which can kill seedlings in just days. I've lost multiple batches because I skipped this step early on.
Germination Hack: The 75-80°F heat mat requirement is non-negotiable for fast germination, but if you don't have one, try placing your pots on top of your refrigerator (not inside) or near a sunny window with indirect heat from a lamp. Just monitor closely—seeds can germinate unevenly without consistent warmth. Once you see those first sprouts, move them immediately to prevent legginess.
Light Optimization: That 6+ hours of bright, indirect light is crucial, but not all windowsills provide equal quality. If your south-facing window gets harsh afternoon sun, place a sheer curtain between the glass and your plants to diffuse the light. I've had basil plants crisp up from intense midday rays, even when positioned 12 inches back. The goal is even, gentle light that encourages dense foliage rather than sunburn.
Pruning Timing: When you reach Step 5 and pinch those top sets of leaves, aim to do this just before harvest time. The plant will respond by sending out new growth from lower leaf nodes, creating a bushier shape. I prune mine every 3-4 weeks instead of the full 4-6 week range—this keeps the plant compact and prevents it from becoming leggy. Just be sure to use clean scissors each time to avoid spreading disease.
Pro Tips for Basil From Seed Indoors
- These game-changing strategies will help you avoid the most common pitfalls when growing basil from seed indoors.
- Container Selection: While 4-inch pots work perfectly, consider using biodegradable pots made from coconut coir or peat.
- Just monitor closely—seeds can germinate unevenly without consistent warmth.
Frequently asked questions
Got questions about growing basil from seed indoors?
You’re not alone! Here are answers to the most common queries to help you cultivate thriving basil plants with ease.
How long does it take for basil seeds to germinate indoors?
Basil seeds typically sprout in 7–14 days when kept in warm (70–75°F), moist conditions. Use a heat mat if your home runs cooler—consistency is key! Avoid overwatering, which can drown seeds before they sprout.
When will my indoor basil be ready to harvest?
You can snip leaves 6–8 weeks after germination, but wait until the plant has at least 6–8 inches of growth. For the best flavor, harvest in the morning after dew dries but before the heat of the day. Never take more than ⅓ of the plant at once!
Why is my indoor basil turning yellow or leggy?
Yellow leaves often signal overwatering or poor drainage, while leggy stems mean it’s craving light. Move your basil to a sunniest windowsill (south-facing is ideal) or supplement with a grow light 12–14 hours daily. Rotate pots weekly for even growth.
Can I grow basil indoors without a grow light?
Yes! A south-facing window with 6+ hours of direct sunlight works, but cloudy days may slow growth. If your space lacks natural light, a basic LED grow bulb (like a T5 fixture) is a budget-friendly fix. Just keep leaves 2–3 inches from the bulb to avoid scorching.
What’s the best way to revive wilted or droopy basil?
Wilting usually means thirst—check soil moisture (it should feel damp but not soggy). Water at the base, avoid wetting leaves, and trim any mushy stems. Place the pot in bright, indirect light for 24 hours to recover. If roots smell rotten, repot in fresh, sterile soil.
Wrapping up and next steps
Growing basil from seed indoors is a rewarding journey that brings fresh, aromatic herbs right to your kitchen—no green thumb required! With the right setup, patience, and a little sunlight, you’ll soon enjoy a thriving basil plant that’s perfect for cooking, garnishing, or sharing with friends. 🌱
Now that you’re armed with tips and troubleshooting advice, take the next step: grab those seeds, set up your sunny spot, and watch your basil grow! Start small, stay consistent, and soon you’ll be harvesting like a pro. Happy growing! 🌿✨